
A bootable USB stick is one a computer can start from instead of its own drive. Write Ubuntu onto one and you can run a full Linux desktop straight off the stick, look around, and then restart back into Windows as if nothing happened. It's a good first taste of Linux, and a handy thing to have in a drawer.
The USB stick will be completely erased
Everything on it (every file and every partition) is replaced by Ubuntu. Use a stick with nothing on it you need, or back it up first.
What you’ll need
- A Windows PC with DiskSnap on it, and an account that can approve an administrator prompt.
- A USB stick of 8 GB or more. The current Ubuntu Desktop ISO is around 6 GB. DiskSnap shows the exact minimum once you choose the file.
- The Ubuntu Desktop ISO, downloaded from the official site: ubuntu.com/download/desktop. For an ordinary Windows PC, pick the Intel/AMD 64-bit (
amd64) download.
Before you start
An ISO file is a single file that holds a complete disk: in this case everything Ubuntu needs to start up. You can’t just drag it onto a USB stick like a normal file; it has to be written to the stick as a whole, byte for byte. That’s the job DiskSnap’s Make Bootable does.
| Item | What happens to it |
|---|---|
| The Ubuntu ISO file | Read only. It isn’t changed. |
| Your USB stick | Erased and overwritten with the contents of the ISO. |
| Your PC’s own drive | Not touched. DiskSnap locks internal drives and the Windows drive, so they can’t be chosen. |
Unplug any other USB drives and SD cards first. With only one removable drive connected, there’s only one thing you could pick.
Make the USB stick
- Plug in the USB stick and open DiskSnap.
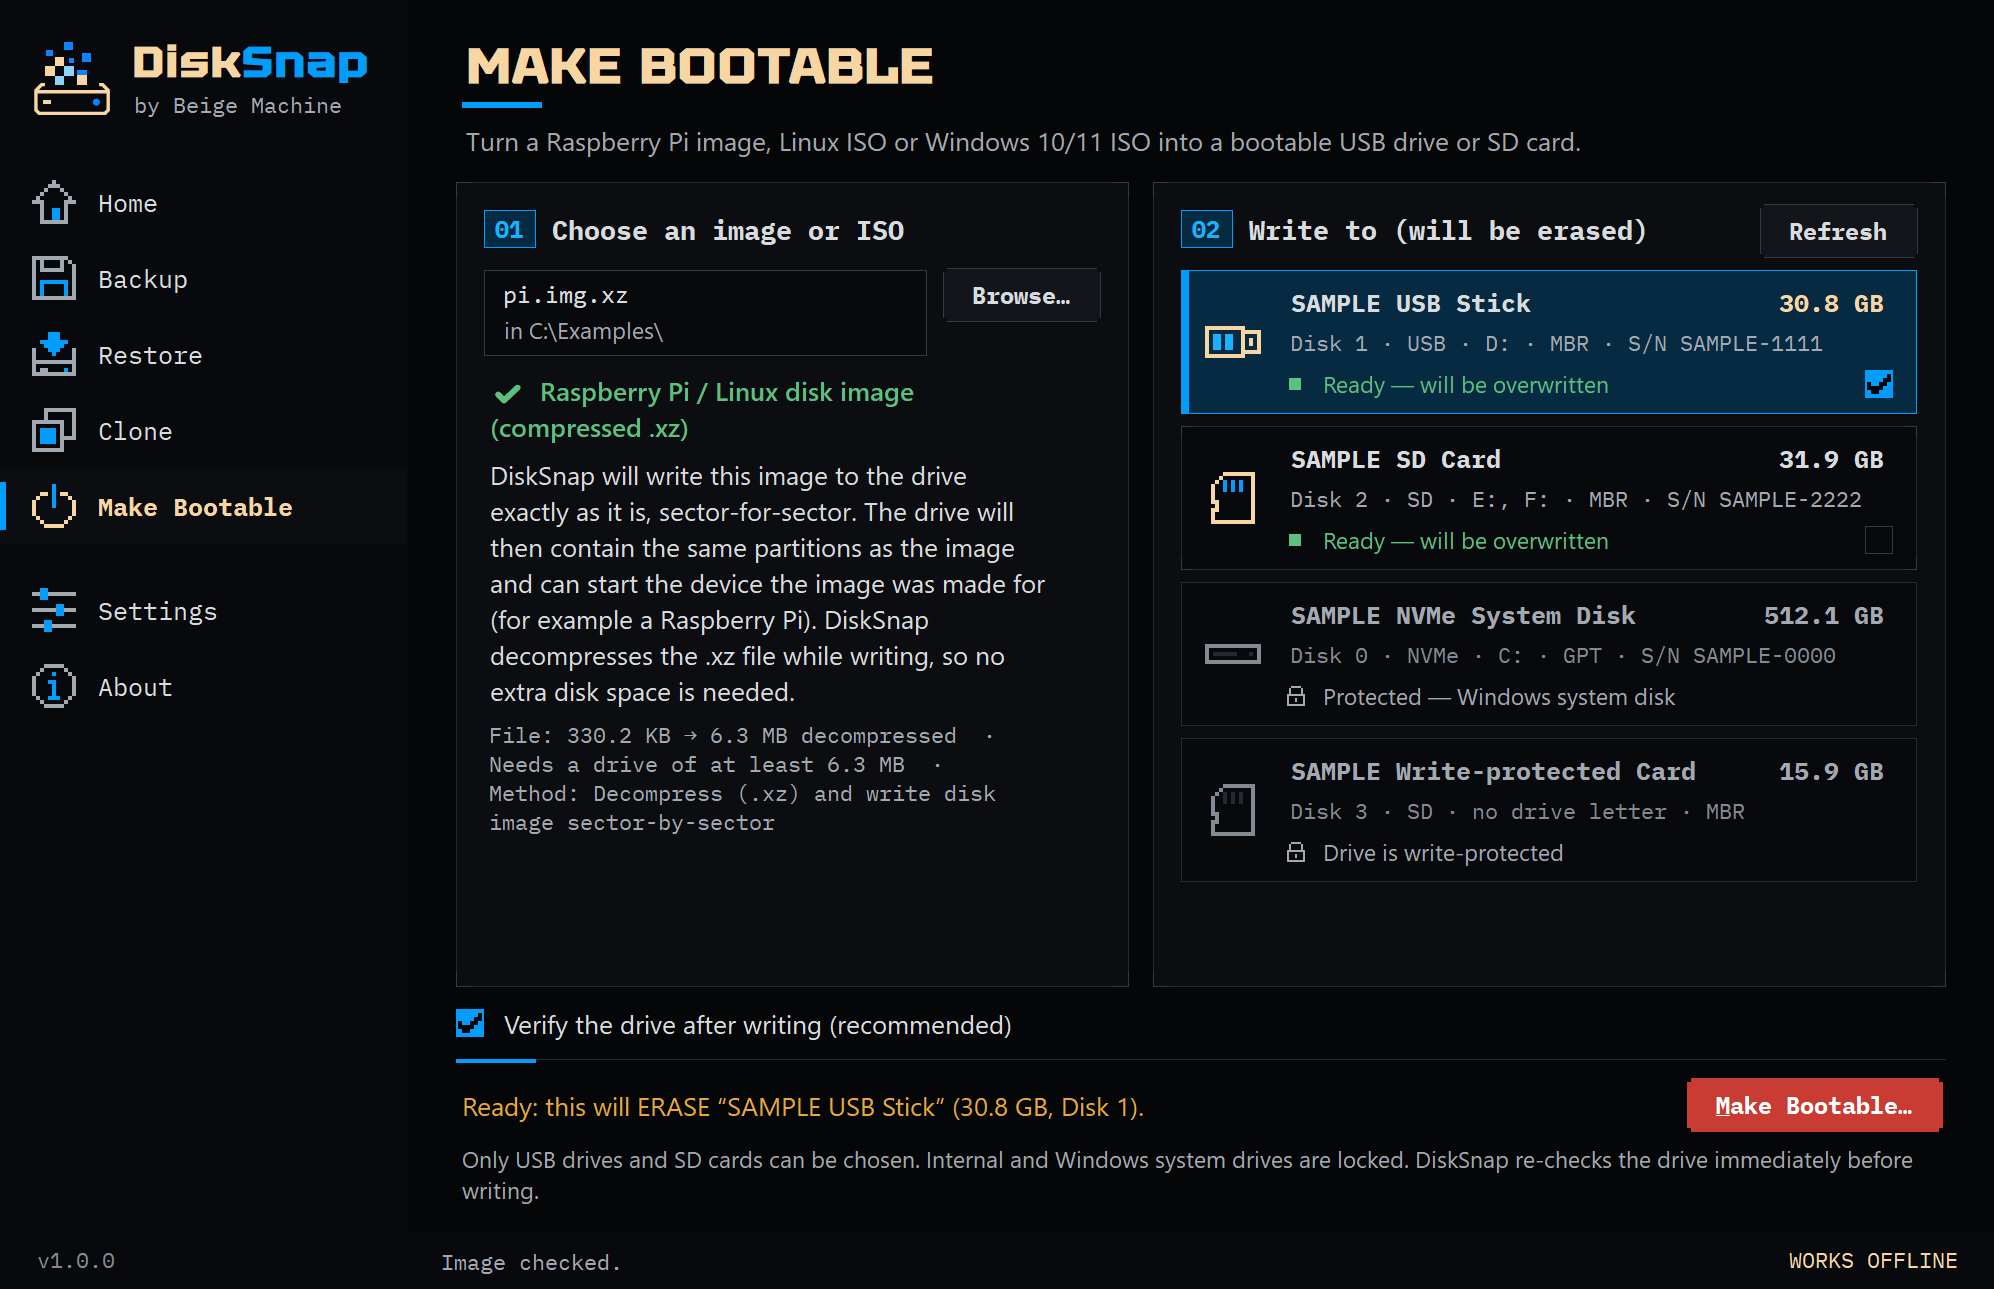
- Click Make Bootable in the menu on the left.
- Choose the Ubuntu ISO under 1 · Choose an image or ISO. DiskSnap looks inside the file and tells you what it found. For Ubuntu that’s Bootable USB ISO (hybrid), followed by the version, for example Ubuntu 26.04.1 LTS amd64. It also shows the smallest drive it will fit on. If the download was cut short, DiskSnap says the ISO is incomplete and won’t use it; download it again.
- Choose your USB stick under 2 · Choose the USB drive or SD card (it will be erased). Drives DiskSnap won’t write to are shown locked, with the reason, for example Protected — Windows system disk.
- Leave Verify the drive after writing (recommended) ticked.
- Click Make Bootable… The first time, DiskSnap explains that writing to a drive needs administrator rights and offers to restart. Say yes, and accept the Windows prompt. DiskSnap reopens with your ISO still selected. Choose the USB stick again (that’s deliberate) and click Make Bootable… once more.
- Check the confirmation box carefully. It shows the stick’s name, size, disk number, drive letters and serial number. If that’s the stick you mean to erase, tick I have checked this is the correct drive…, type ERASE, and confirm.
- Wait. A progress window shows each stage, how much has been written and the speed. Leave the stick plugged in until it finishes.
What DiskSnap does while it works
Just before writing, DiskSnap checks again that the drive you confirmed is still the same drive, that it’s a USB stick or SD card, and that it isn’t your Windows drive. It then locks the stick so Windows and other programs keep their hands off it, clears its old partition table, and copies the ISO onto it sector by sector. With Verify on, it then reads the whole written area back and compares it with the ISO.
How to know it worked
The progress window ends with Complete, Verify: passed — the drive matches the image, and a Bootable drive ready message. That means the stick now holds exactly what’s in the ISO, checked byte for byte (using a SHA-256 fingerprint, which DiskSnap shows you).
What it can’t promise is that every computer will agree to start from it. That’s down to the computer’s own settings, which is what the next section is about.
Windows wants to format the stick? Click Cancel.
After writing, Windows may say a partition on the stick needs formatting. It’s seeing Linux partitions it can’t read. That’s normal. Formatting would undo what you just made.
Start a PC from the stick
- With the stick plugged in, restart the PC.
- As it starts, press its boot menu key. It depends on the make; F12, F11, F10, F9 and Esc are common. The boot-from-USB guide covers this, and a Windows route that avoids hunting for the key.
- Pick the USB stick. If it’s listed twice, choose the entry marked UEFI.
- Ubuntu’s start menu appears. Choose Try or Install Ubuntu.
- Ubuntu’s installer opens and asks a few questions, such as language and keyboard. When it offers Try Ubuntu or Install Ubuntu, choose Try Ubuntu. The exact wording can vary a little between Ubuntu versions.
You’re now running Ubuntu from the stick. Nothing is installed, and Windows isn’t changed. Changes you make in Ubuntu are lost when you shut it down. When you’re done, shut Ubuntu down and remove the stick; the PC starts Windows as usual.
Troubleshooting
The most common problems are below. For everything else, see DiskSnap Troubleshooting, organised by what you see.
The stick isn’t in DiskSnap’s list, or it’s locked
Press Refresh, or try a USB port directly on the PC rather than a hub. If the stick is listed but locked, the reason is written on it: for example, a write-protected drive, or the ISO file itself being stored on that stick (move it to your PC first).
DiskSnap says the file can’t be used
Read the explanation it gives. The usual causes are an unfinished download, or a .zip archive that needs extracting first. Download the ISO again from the official Ubuntu site.
Verification failed
Don’t use that stick. Try again in a different USB port. If it fails again, the stick is probably worn out or faulty. Some cheap sticks claim to be bigger than they are.
The PC starts Windows as normal
The boot menu key wasn’t caught in time, or the stick wasn’t chosen. Try again, or use the Windows route in the boot-from-USB guide.
The stick is refused, or you see a security or signature error
This is usually Secure Boot, a firmware feature that only lets approved start-up software run. Ubuntu is built to work with it, and on most PCs it just does. But some PCs are stricter. Check the image publisher’s boot requirements and your computer manufacturer’s guidance.
Turning Secure Boot off isn’t something to reach for first, and it isn’t something DiskSnap needs. Read Secure Boot: why won’t my USB boot? before changing anything. In particular, if Windows uses BitLocker, have your recovery key ready: firmware changes can trigger a recovery prompt.
Safety notes
- Make Bootable replaces the whole stick, not just part of it.
- Only USB sticks and SD cards can be chosen. Internal drives and the Windows drive are always locked.
- If you cancel partway, or the stick is pulled out, it’s left incomplete and won’t boot. Run Make Bootable again, or format the stick in Windows to reuse it.
- Download ISOs only from the official Ubuntu site.