

1. What DiskSnap is
DiskSnap is a small Windows program for working with USB sticks and SD cards. It does four jobs:
- Make Bootable: turn a downloaded image or ISO (for example Ubuntu Linux) into a USB stick or SD card you can start a computer from.
- Backup: save an entire USB stick or SD card into a single file on your PC.
- Restore: write one of those backup files back onto a USB stick or SD card.
- Clone: copy one USB stick or SD card directly onto another.
It's built for the kind of drives people set up once and don't want to set up again: a Raspberry Pi card, a Linux install stick, a retro gaming card, a stick of tools.
DiskSnap works entirely offline. It doesn't need an account and never uploads anything.
In one sentence
DiskSnap copies whole drives exactly, byte for byte, checks the copy, and goes out of its way to stop you erasing the wrong drive.
2. Current version at a glance
Choose the tool that matches your task. Restore, Clone and Make Bootable overwrite the selected target drive.
| Tool | Use it to | What is written |
|---|---|---|
| Backup | Save an entire drive as a .dsnap file | A file on your PC; the source drive is only read |
| Restore | Put a .dsnap backup onto a drive | The selected target drive |
| Clone | Copy one drive directly to another | The selected target; the source is only read |
| Make Bootable | Write a supported image or prepare Windows installation media | The selected target drive |
3. System requirements
- A currently supported Windows 11 edition on an x64 PC (Intel or AMD). This is not an ARM-native or 32-bit build. Some Windows 10 LTSC/Enterprise editions are supported by the bundled runtime; see the installation requirements for the distinction.
- Administrator rights on the PC, for any operation that reads or writes a whole drive (see §4).
- A USB port or SD card reader.
- For Backup: free space on your PC for the backup file (see §11).
The Windows x64 package includes the .NET runtime needed to run DiskSnap.
4. Installing and starting DiskSnap
Get DiskSnap from the official Beige Machine download page. Run the installer and follow its prompts. You may need administrator approval to install. Launch DiskSnap from the Start menu. To remove it, open Windows Settings → Apps → Installed apps, find DiskSnap and choose Uninstall. Keep any backup files you still need.
Starting DiskSnap
DiskSnap starts normally, without administrator rights. You can look around, choose files and see your drives without it asking for anything.
Only one copy of DiskSnap can run at a time. This is deliberate: two copies working on the same drive could be dangerous.
Administrator rights (elevation)
Reading or writing a whole drive needs administrator rights in Windows. DiskSnap only asks for them when you actually start an operation:
- You press the button to start (for example Make Bootable…).
- DiskSnap explains that it needs administrator rights and offers to restart as administrator.
- You say yes, and Windows shows its own permission prompt (User Account Control). Accept it.
- DiskSnap reopens on the same page. ADMINISTRATOR appears in the bottom-right corner.
What's kept after the restart:
| Page | Kept | You choose again |
|---|---|---|
| Make Bootable | The image you selected | The target drive |
| Backup | The save folder, if you chose one on the page | The drive to back up |
| Restore | The backup file you selected | The target drive |
| Clone | Nothing | Both drives |
Why choose the drive again?
Drive numbers in Windows can change when you plug things in or out. DiskSnap never assumes a drive is still the same one after a restart. You pick it again, and it's re-checked.
If you decline the Windows prompt, nothing happens and DiskSnap stays as it was.
5. The DiskSnap window
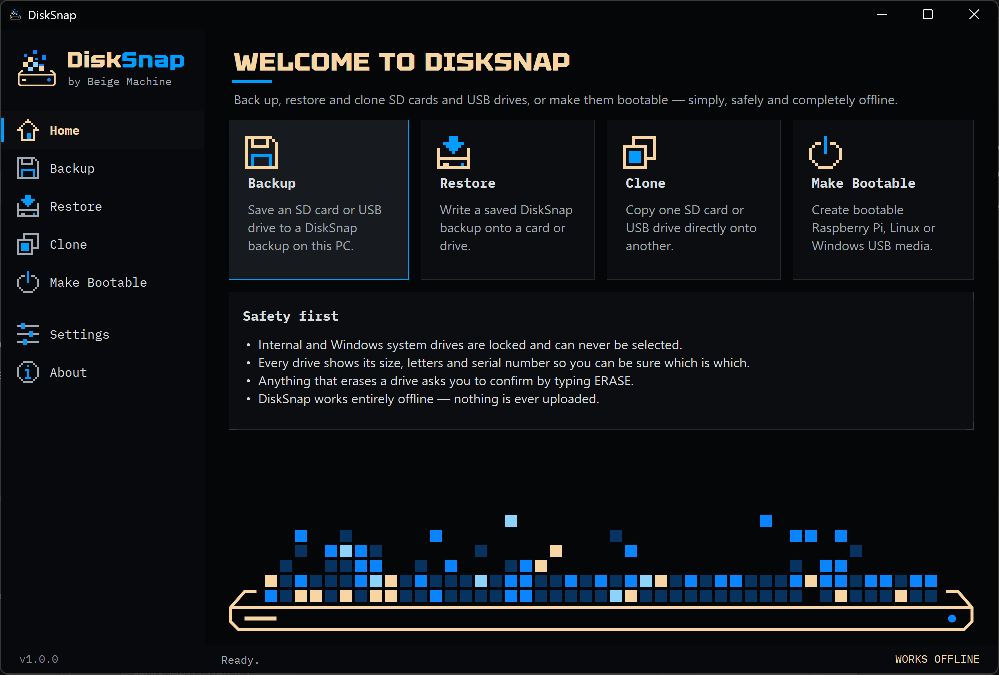
- Sidebar: Home, Backup, Restore, Clone, Make Bootable, Settings, About.
- Drive lists: each drive appears as a card (see below).
- Status bar (bottom): how many drives were found, plus WORKS OFFLINE, and ADMINISTRATOR when running elevated.
Drive cards
Every drive card shows:
- the drive's name (as Windows reports it), such as SanDisk Cruzer Blade
- its size
- its disk number, connection type (USB, SD, NVMe and so on), drive letters, partition style (MBR or GPT), and serial number (S/N)
- a status line, such as Ready, Ready — will be overwritten, or a locked reason
A locked card is shown greyed out with a padlock and a reason. It can't be selected. See §7 for the reasons.
DiskSnap notices when you plug in or remove a drive and refreshes the list by itself. There's also a Refresh button.
Settings
- Backup folder: where backups are saved by default.
- Verify after every operation (recommended): on by default.
- Compress new backups: on by default.
- Open log folder and Open settings folder.
Settings are stored in %AppData%\Beige Machine\DiskSnap\settings.json. Logs are stored daily in %LocalAppData%\Beige Machine\DiskSnap\Logs. If something goes wrong, the log is the first thing to look at.
6. How DiskSnap identifies drives
Picking the right drive is the most important step in any disk tool. DiskSnap helps in three ways.
1. It shows you enough to tell drives apart. Name, size, disk number, drive letters, partition style and serial number all appear on each card. The confirmation box before anything is erased repeats the target's full serial number.
Two identical sticks?
If you have two sticks of the same make and size, the serial number is the only reliable way to tell them apart. Check it in the confirmation box every time.
2. It uses a stable identity, not just the disk number. Windows gives each connected drive a disk number (Disk 1, Disk 2…), but those numbers can change when drives are plugged or unplugged. DiskSnap also records each drive's identity:
- Windows' unique ID for the drive, when Windows reports one;
- otherwise, a combination of the drive's name, serial number and size.
3. It re-checks everything just before it starts. Immediately before any operation, DiskSnap scans the drives again and confirms the selected drive still has the same identity, and the same disk number, and the same size. If anything changed, it stops with a message that nothing was written (or, for Backup, nothing was copied).
Known edge case
two drives of the same model that report no unique ID and no serial number would get the same identity. DiskSnap handles this by refusing (the second drive shows as "This is the source drive" in Clone). It doesn't risk writing to the wrong drive, but it can block a legitimate clone. If the drives cannot be distinguished, do not bypass the restriction.
7. Safety: how DiskSnap protects your drives
DiskSnap is deliberately cautious. Here is what it does.
Drives that are always locked
A drive is shown but can't be selected, for any operation, if:
- it's the Windows system or boot disk, or holds the drive Windows is installed on ("Protected — Windows system disk");
- it isn't connected as USB, SD or MMC. Internal SATA, NVMe, RAID, virtual and unknown drives are all locked;
- no media is present, for example an empty card reader ("No media detected — insert a card");
- Windows has it offline.
Extra locks for drives that would be erased
For the target of Make Bootable, Restore or Clone, a drive is also locked if:
- it's write-protected (for example an SD card with its lock switch on);
- DiskSnap itself is running from it;
- your DiskSnap backup folder is on it;
- it holds the image file you're writing (Make Bootable) or the backup file you're restoring (Restore);
- it's the source drive you chose (Clone);
- it's smaller than needed (Restore and Clone).
Drives larger than 2 TB can be selected but show a warning, since that's unusually large for a USB stick or SD card.
Before anything is erased
- A confirmation box lists the target drive's name, size, disk number, drive letters and serial number. You must tick "I have checked this is the correct drive and understand all data on it will be lost." and type ERASE.
- The drive is re-checked (see §6).
- Windows is asked directly. DiskSnap queries the drive's hardware driver, independently of the drive list, and refuses unless the device really is that disk number, is on USB/SD/MMC, has exactly the expected size, and isn't the Windows disk or the drive DiskSnap runs from.
- The drive is locked and dismounted, so Windows and other programs can't use it while it's rewritten.
Drives that are only read
The Backup drive and the Clone source are opened read-only: DiskSnap never even asks Windows for write access to them. Their partitions are locked (not dismounted) while they're read, so nothing can change halfway through a copy.
Preparing the target
Just before the first byte of data is written, DiskSnap prepares the target. It locks and dismounts the drive's partitions, removes its old partition table, sets up a new, empty one, and clears the last 1 MiB of the drive (where GPT drives keep a spare copy of their partition table). Then it writes.
This step exists because Windows refuses to let a program write over partitions it still knows about. DiskSnap re-checks the drive's identity after each step of this, and stops if anything looks wrong. The progress window shows it as Preparing the drive.
Once preparation has started, the drive's old contents should be considered gone, even if the operation then stops.
While it works: progress and status
A progress window shows:
- the current stage, for example Checking the drive, Preparing the drive, Writing image, Restoring the drive, Cloning the drive or Verifying;
- how much has been processed, the speed, the elapsed time and roughly how long is left in this stage;
- a status line for the writing part (for example Write: done) and one for Verify (waiting, in progress, passed, FAILED, or off (skipped)).
DiskSnap keeps the PC from going to sleep while it works. The screen may still turn off. Closing the progress window while it's working counts as asking to cancel.
Cancelling
Press Cancel in the progress window. DiskSnap asks you to confirm and says what state things will be left in, then stops at the next safe point (Cancelling — finishing the current step…).
| Cancelled during | What you’re left with |
|---|---|
| Backup | The drive is unchanged. The unfinished backup file is deleted. |
| Make Bootable, Restore, Clone: before preparation | Nothing was written. The target is as it was. |
| Make Bootable, Restore, Clone: after preparation started | The target is incomplete and its old contents are gone. Write it again, or format it in Windows to reuse it. The image, backup file or Clone source is not affected. |
If something fails
The progress window turns red and explains what happened in plain words. DiskSnap is careful about one thing in particular: it only says “Nothing was written” when it stopped before changing the target. If it had already started preparing or writing, it says so: “The drive may already have been changed… Don’t use the drive until it has been written again successfully.” Part of a write can reach a drive even when Windows reports an error straight away, so DiskSnap never assumes a failed write left the drive untouched.
The source (image, backup file or Clone source drive) is never affected by a failed write. See Troubleshooting: after a failed or interrupted operation.
What DiskSnap will and won’t erase
- Will erase: the one target drive you selected and confirmed, for Make Bootable, Restore or Clone. All of it.
- Won’t erase: the drive you back up, the Clone source, the image or backup file you’re writing from, any internal drive, the Windows drive, the drive DiskSnap is running from, or the drive holding your backup folder.
- Backup never erases anything. It only reads a drive and creates a new file (and asks before replacing a file with the same name).
Warning — what "the target will be erased" really means
Make Bootable, Restore and Clone replace the whole target drive. Every partition and every file on it is gone, not just the part being written to. There’s no undo. Only ever choose a target that holds nothing you need.
8. Supported media
| Type | Supported |
|---|---|
| USB flash drives | Yes |
| SD / microSD cards (built-in reader, SD connection) | Yes |
| SD / microSD cards in a USB card reader (USB connection) | Yes |
| External USB hard drives / SSDs | Allowed if Windows reports them as USB |
| Internal drives (SATA, NVMe, etc.) | Never |
Drives must use a standard sector size (512, 1024, 2048 or 4096 bytes). Nearly all USB sticks and SD cards use 512.
9. Backup, restore, clone, make bootable: what's the difference?
All four work on the whole drive, sector by sector (a sector is the smallest block a drive stores, usually 512 bytes). None of them copy individual files.
| Reads from | Writes to | Target erased? | |
|---|---|---|---|
| Make Bootable | An image/ISO file | A USB stick or SD card | Yes |
| Backup | A USB stick or SD card | A .dsnap file on your PC |
No (only a new file is created) |
| Restore | A .dsnap file |
A USB stick or SD card | Yes |
| Clone | A USB stick or SD card | Another USB stick or SD card | Yes |
- Imaging is the general term for copying a drive exactly, sector by sector, rather than file by file. The copy includes partition tables, boot code, hidden partitions and file systems Windows can't read, such as Linux ones.
- Backup + Restore is imaging via a file. You can keep the file, store it elsewhere and restore it later, as many times as you like.
- Clone is imaging directly from one drive to another, with no file in between.
- Make Bootable writes a downloaded image to a drive. For Linux ISOs and disk images that's also imaging. Windows installers are handled differently (see §10).
Source and target
Every operation has a source (what’s read) and most have a target (what’s written). DiskSnap’s screens use these words consistently:
- The source is only ever read. For Backup and Clone it’s a drive, and DiskSnap opens it read-only: it never even asks Windows for permission to write to it. For Make Bootable and Restore it’s a file.
- The target is the drive that gets erased and overwritten. On screen its heading always says so: (it will be erased).
Clone is the only operation with two drives: 1 · Copy from is the source and 2 · Copy to (it will be erased) is the target. Getting them the wrong way round would wipe the drive you meant to copy, so check both before you confirm (§13).
10. Make Bootable
Step-by-step guide: Make a bootable Ubuntu USB
Make Bootable turns a downloaded image or ISO into a bootable USB stick or SD card.
What files it accepts
DiskSnap looks at what's inside the file, not just its name, and decides how to write it:
| What DiskSnap detects | How it writes it |
|---|---|
| Hybrid ISO (most Linux distributions, e.g. Ubuntu) | Copied sector by sector |
Whole-disk image (e.g. Raspberry Pi OS .img) |
Copied sector by sector |
Disk images compressed as .xz or .gz |
Decompressed on the fly while writing; no extra disk space needed |
| Windows 10/11 installation ISO | Drive partitioned and formatted as FAT32, files copied, large install.wim split if needed. UEFI boot only |
DiskSnap refuses files it can't make bootable, and explains why:
- CD/DVD-only ISOs (not "hybrid"), which wouldn't boot from USB;
- single-partition images, which have no partition table;
- incomplete downloads, for example an ISO shorter than it should be or a damaged
.xz; - compressed Windows ISOs (unzip them first);
- Windows ISOs without a UEFI boot loader.
Step by step
- Plug in the USB stick or SD card. Unplug any other removable drives so there's only one possible target.
- Open Make Bootable and choose your image under 1 · Choose an image or ISO. DiskSnap checks it and shows what it found, the method it will use, and the smallest drive it needs.
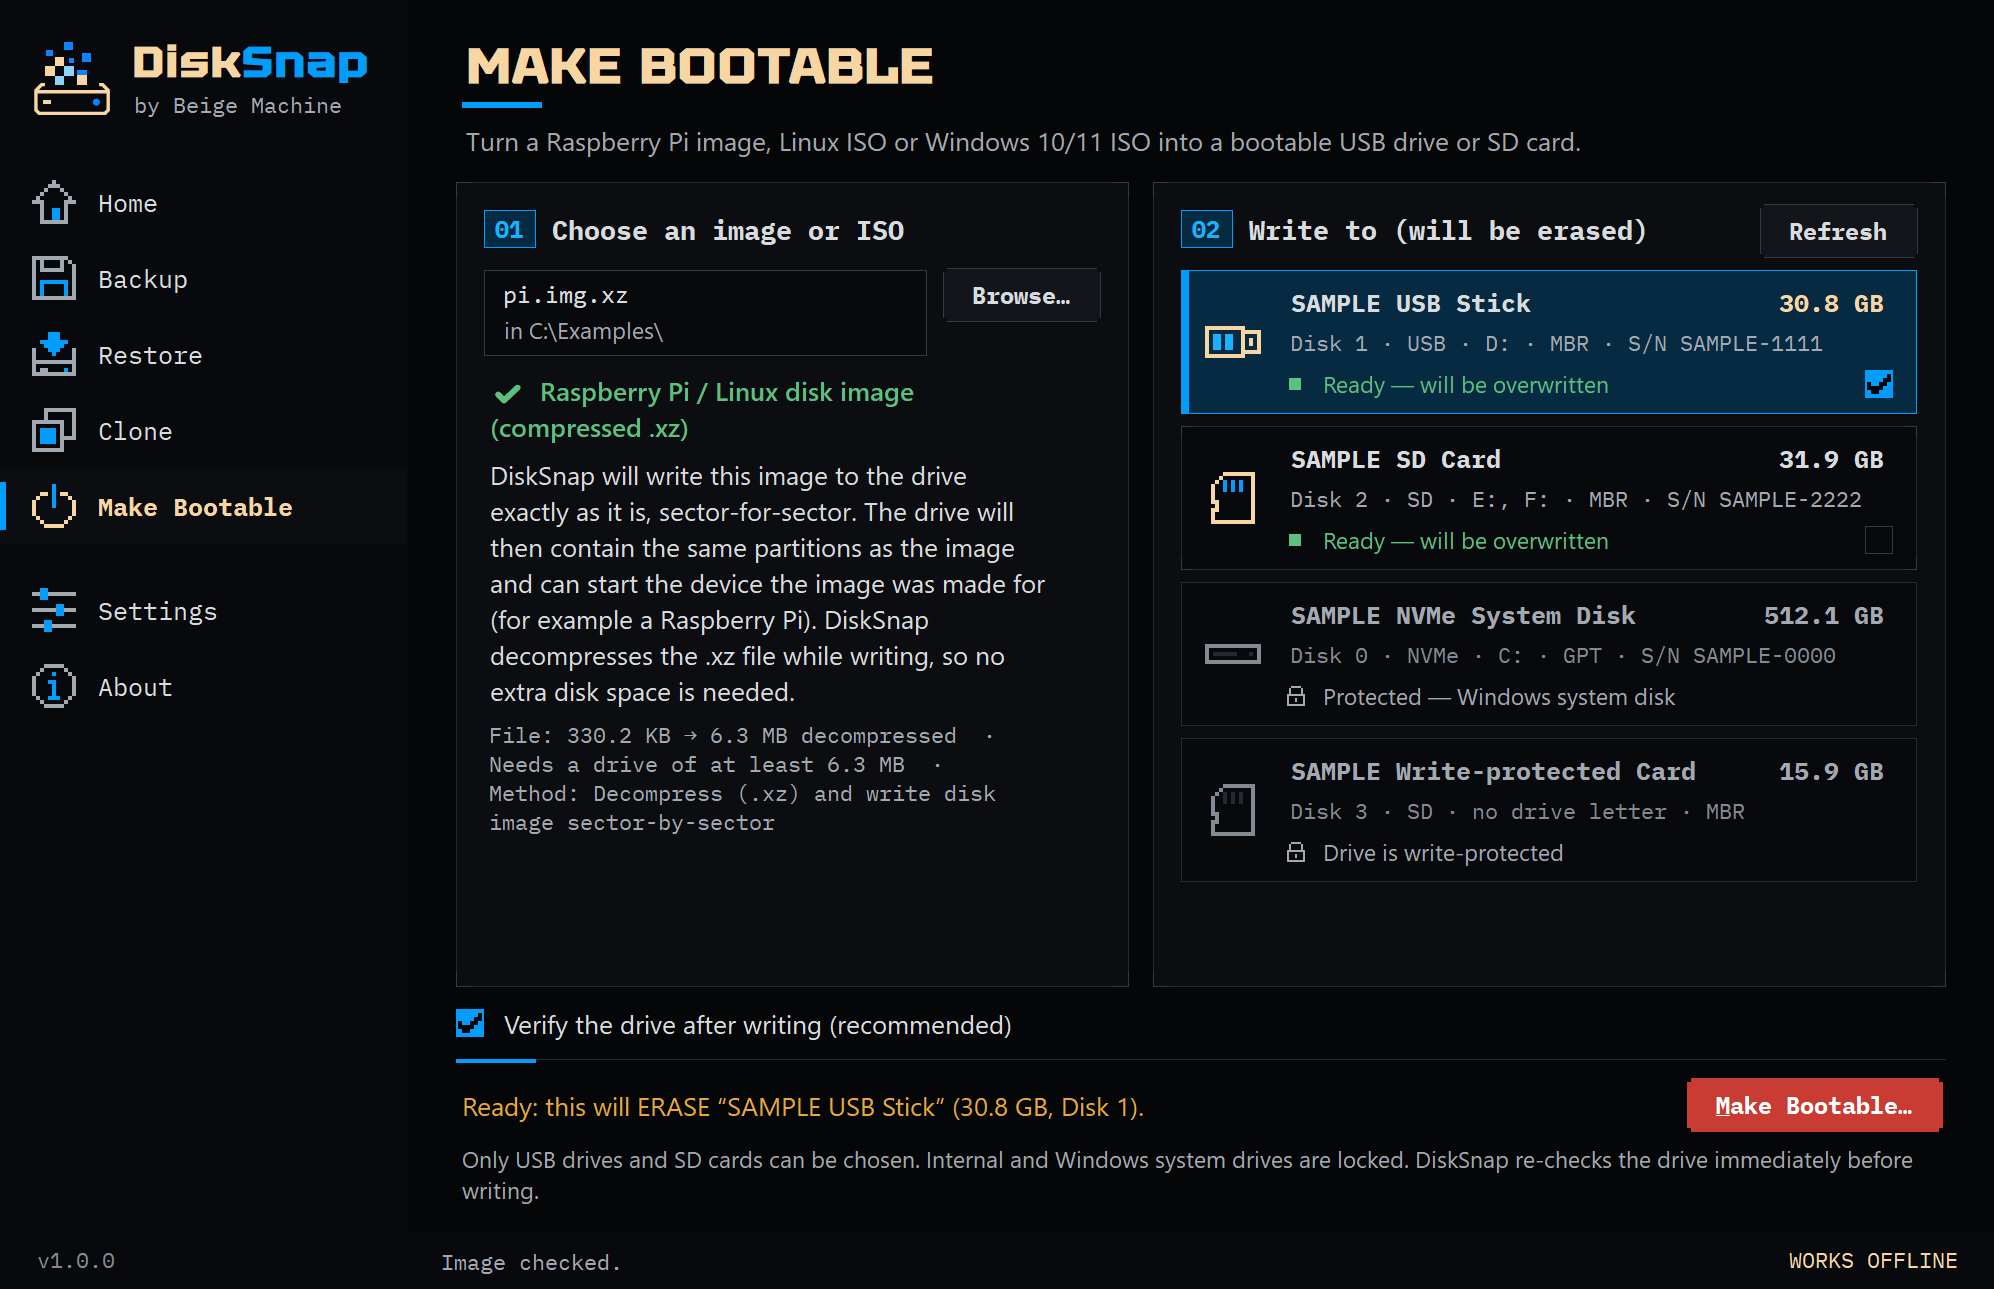
Make Bootable with a sample disk image selected — example screen. Drive names and values are illustrative. Click to view full size. - Choose the target under 2 · Choose the USB drive or SD card (it will be erased). Drives that are too small, or that hold the image file, are locked.
- Leave Verify the drive after writing (recommended) ticked.
- Press Make Bootable… Allow the administrator restart if asked (§4), then choose the drive again.
- Confirm. Check the drive details and serial number, tick the box and type ERASE.
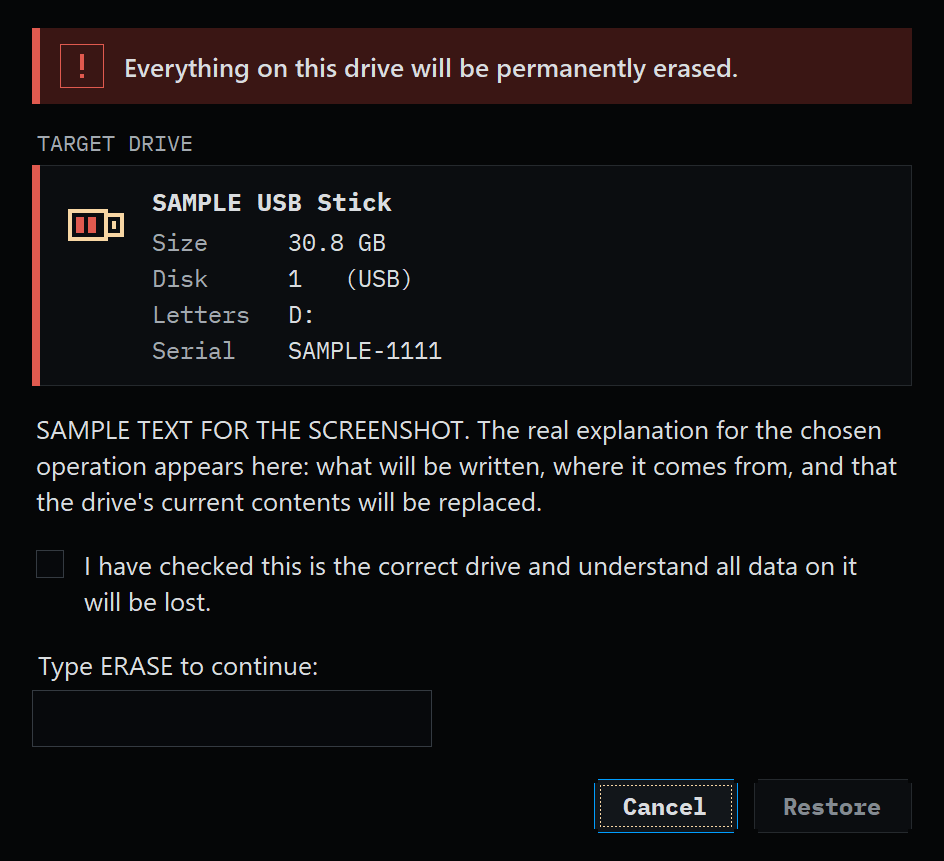
The typed ERASE confirmation — example screen. Drive names and values are illustrative. Click to view full size. - Wait. DiskSnap shows progress, speed and elapsed time, then verifies.
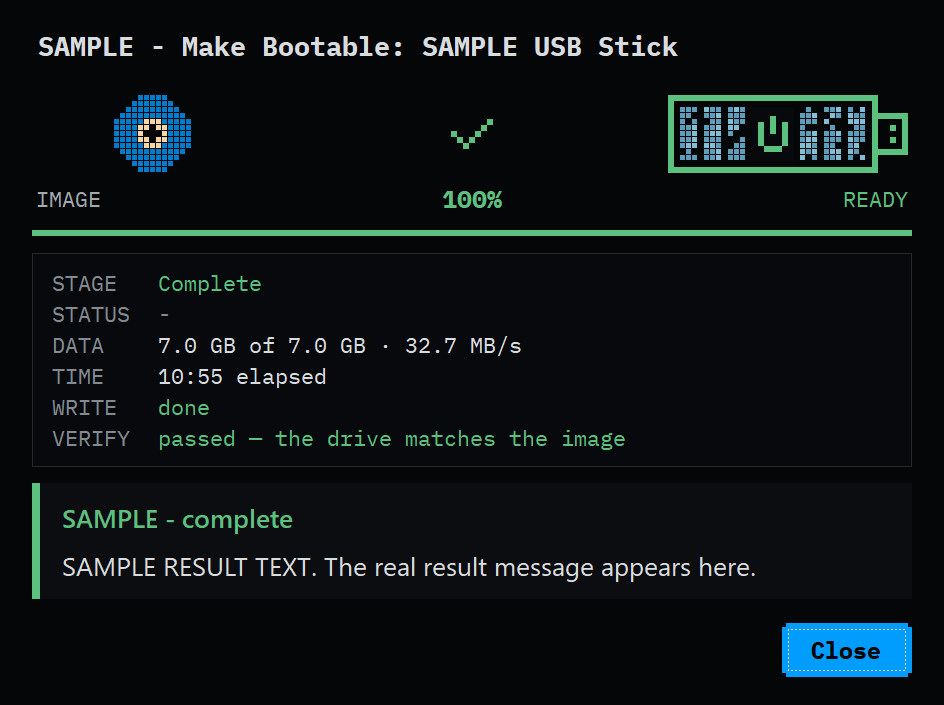
Illustrative Make Bootable completion screen with simulated results. Click to view full size.
What "complete" means
The progress window ends with Complete, Verify: passed — the drive matches the image, and a green Bootable drive ready panel showing how much was written and a SHA-256 checksum.
For Linux ISOs and disk images, verification passed means DiskSnap read the drive back and its contents match the image exactly (by SHA-256, see §14). The drive holds exactly what the image’s creator intended.
It doesn’t guarantee that a particular computer will boot it. That depends on the computer (see below).
For Windows installers, verification works differently: DiskSnap checks the copied files and that the UEFI boot loader is present.
Windows may ask to format the drive
after writing a Linux or Raspberry Pi image. Click Cancel. Windows can’t read Linux partitions and offers to format them. Formatting would erase what you just made.
Booting the drive
- Leave the drive plugged in and restart the computer.
- Press the boot menu key as it starts. It varies by manufacturer and is often F12, F11, F10, F9 or Esc. On Windows 11 you can also use Settings → System → Recovery → Advanced startup → Restart now → Use a device.
- Choose the USB drive. If it’s listed twice, the entry marked UEFI is usually the right one.
- For Ubuntu, choose Try or Install Ubuntu, then Try Ubuntu to run it without installing anything.
The guide Boot a PC from USB covers this in more detail.
BIOS/UEFI and Secure Boot
- UEFI is the modern replacement for the old PC BIOS. Almost all PCs from the last decade use UEFI.
- DiskSnap’s Windows installer media is UEFI-only. Older BIOS-only PCs aren’t supported.
- Secure Boot is a UEFI feature that only starts software signed by trusted keys. Many Linux distributions, Ubuntu included, support it, so most PCs start them with Secure Boot left on.
DiskSnap does not require Secure Boot to be turned off to write a drive. Booting the resulting media depends on the image and your computer’s firmware. Read Secure Boot: why won’t my USB boot? before changing firmware settings.
Before changing any firmware settings
if the PC uses BitLocker (many Windows 11 laptops do), have your BitLocker recovery key ready first. Changing Secure Boot can make Windows ask for it at the next start. Write down every setting you change so you can change it back.
11. Backup
Step-by-step guide: Back up a USB stick or SD card
Backup saves a whole USB stick or SD card as a single .dsnap file.
Backup only reads the drive. Nothing on it is changed.
Step by step
- Plug in the drive and close any File Explorer windows showing it. DiskSnap locks the drive while it reads it, and can't if something else is using it.
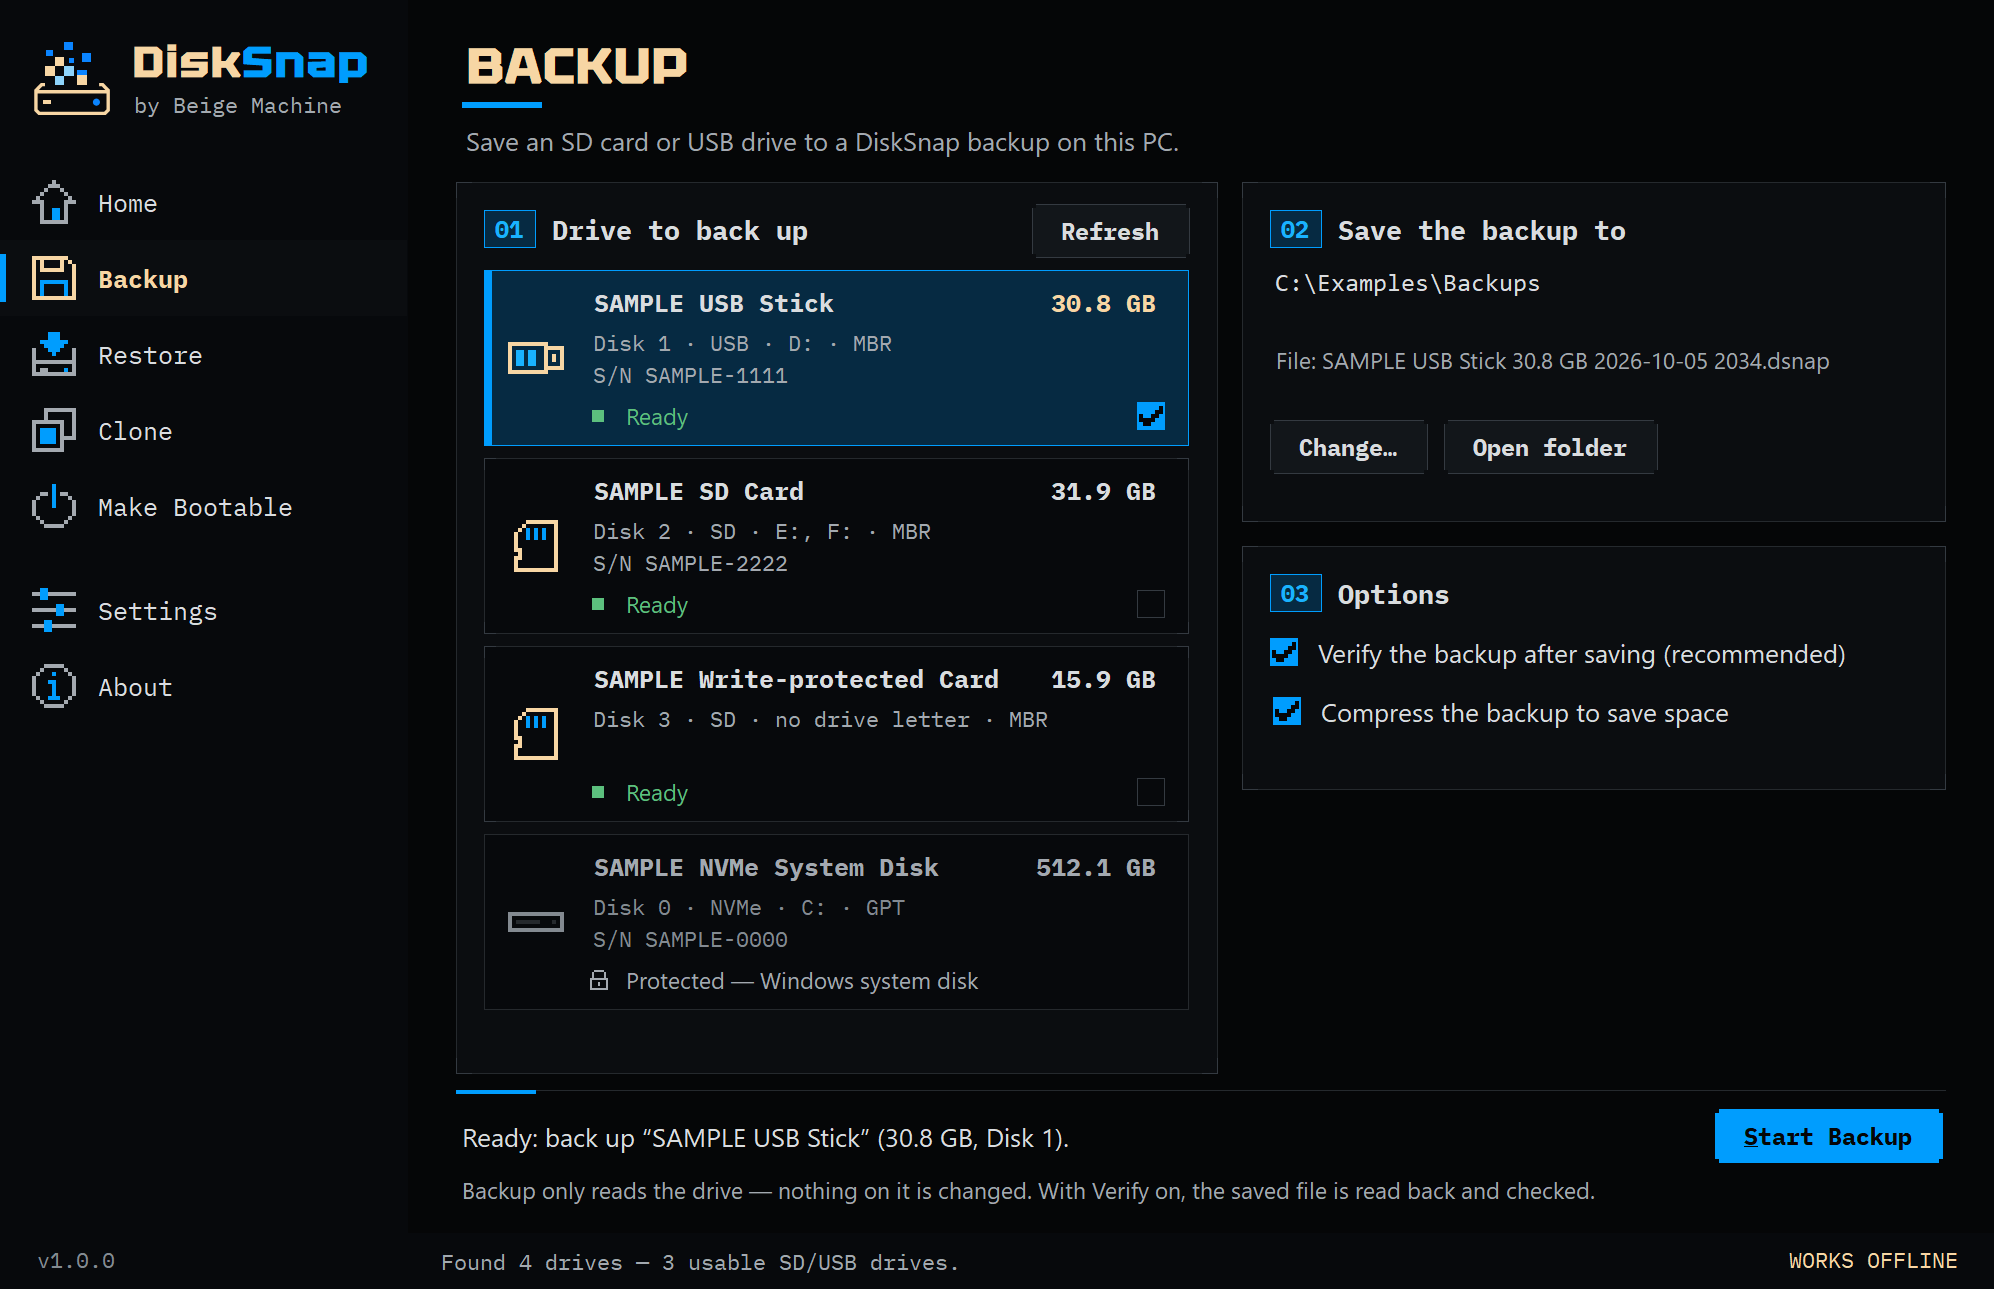
- Open Backup and choose the drive under Drive to back up.
Choose the drive and backup destination — example screen. Drive names and values are illustrative. Click to view full size. - Check where it will be saved under Save the backup to. DiskSnap suggests a file name like
USB Drive 32 GB YYYY-MM-DD HHMM.dsnap. - Leave Verify the backup after saving (recommended) and Compress the backup to save space ticked.
- Click Start Backup. Allow the administrator restart if asked. The save folder is kept; choose the drive again.
- Check the summary in the Back up this drive? box (drive, file name, folder, options and any warnings) and click OK.
- Wait. The progress window ends with Complete, Backup: done and Verify: passed — the backup file is intact. The green Backup complete panel shows the drive size next to the backup file’s size, where it was saved, and the drive’s SHA-256. The status bar says Backup saved: ….
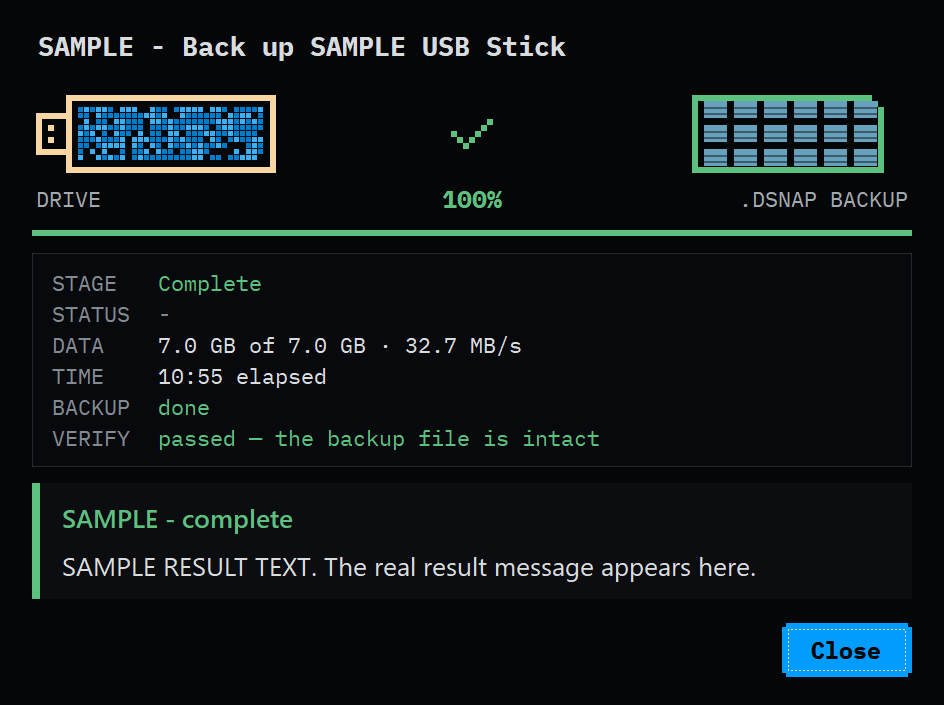
Illustrative Backup completion screen with simulated results. Click to view full size.
Choosing where to save
- The default folder is %USERPROFILE%\DiskSnap Backups. You can change it in Settings or on the Backup page.
- You can't save onto the drive being backed up. DiskSnap refuses.
- DiskSnap warns you before starting if the destination has less free space than the drive's size (the backup may still fit once compressed), or if it uses FAT32, which can't hold files over 4 GB. If either limit is hit, DiskSnap stops and deletes the unfinished file.
Cloud-synced folders
On many PCs the Documents folder is synced to OneDrive, and syncing a very large file while it’s being written isn’t ideal. We recommend saving to a local, non-synced folder, then copying the finished backup wherever you like. We haven’t measured what happens when saving straight into a OneDrive folder. The current default is already outside Documents (§22).
What a backup contains
A DiskSnap backup is a raw image: every sector of the drive, from the first to the last. That includes:
- the partition table (MBR or GPT) and boot code;
- every partition, including hidden ones and ones Windows can't read (Linux, Raspberry Pi);
- empty space too. DiskSnap doesn't look at files, so it can't tell "deleted" from "in use".
It also records details of the original drive (name, vendor/product, serial, connection, partition style, sector size, exact size in bytes), the DiskSnap version, the date, and a SHA-256 checksum of the whole drive.
Compression and empty space
The drive is stored in 1 MiB blocks:
- blocks that are entirely zeros take up almost no space in the file;
- other blocks are compressed (Deflate, fastest setting) only when that makes them smaller, otherwise stored as they are;
- with Compress turned off, zero blocks are still skipped, but nothing else is compressed.
So a mostly blank drive makes a much smaller file than its size, and a drive that’s full (or has held a lot of data) makes a bigger one. The finished backup shows both sizes.
Empty isn't always zero
Space that once held files may still contain old data even if it's "empty" now, and a drive that has been used a lot may back up larger than you expect. That's how raw images work.
Integrity: how DiskSnap knows the backup is good
- Every block has its own CRC-32 checksum, and the header, index and end-of-file marker are checksummed too.
- The whole drive's SHA-256 is stored in the file.
- The backup is written as
name.dsnap.partialfirst. It only gets its real name after it has finished and passed verification. An unfinished file never looks finished. - Verify reads the finished file back from disk, bypassing Windows' cache, checks every block, and confirms the SHA-256 matches what was read from the drive. The drive itself isn't read a second time.
- If a file with the same name exists, DiskSnap asks first, and only replaces it after the new backup succeeds.
- If you Cancel, the unfinished file is deleted and the drive is untouched.
The .dsnap format (for the curious)
| Part | What it holds |
|---|---|
| Header (4 KiB) | Format version (1.0), block size, sector size, drive size, date, compression flag, drive details, checksum |
| Blocks | One record per 1 MiB block: zero, raw or compressed, with checksums |
| Index | Where every block is in the file, plus the whole-drive SHA-256 |
| Trailer | Written last, so a cut-short or half-copied file is always detected |
A backup made by a newer DiskSnap format version is refused with a message asking you to update.
12. Restore
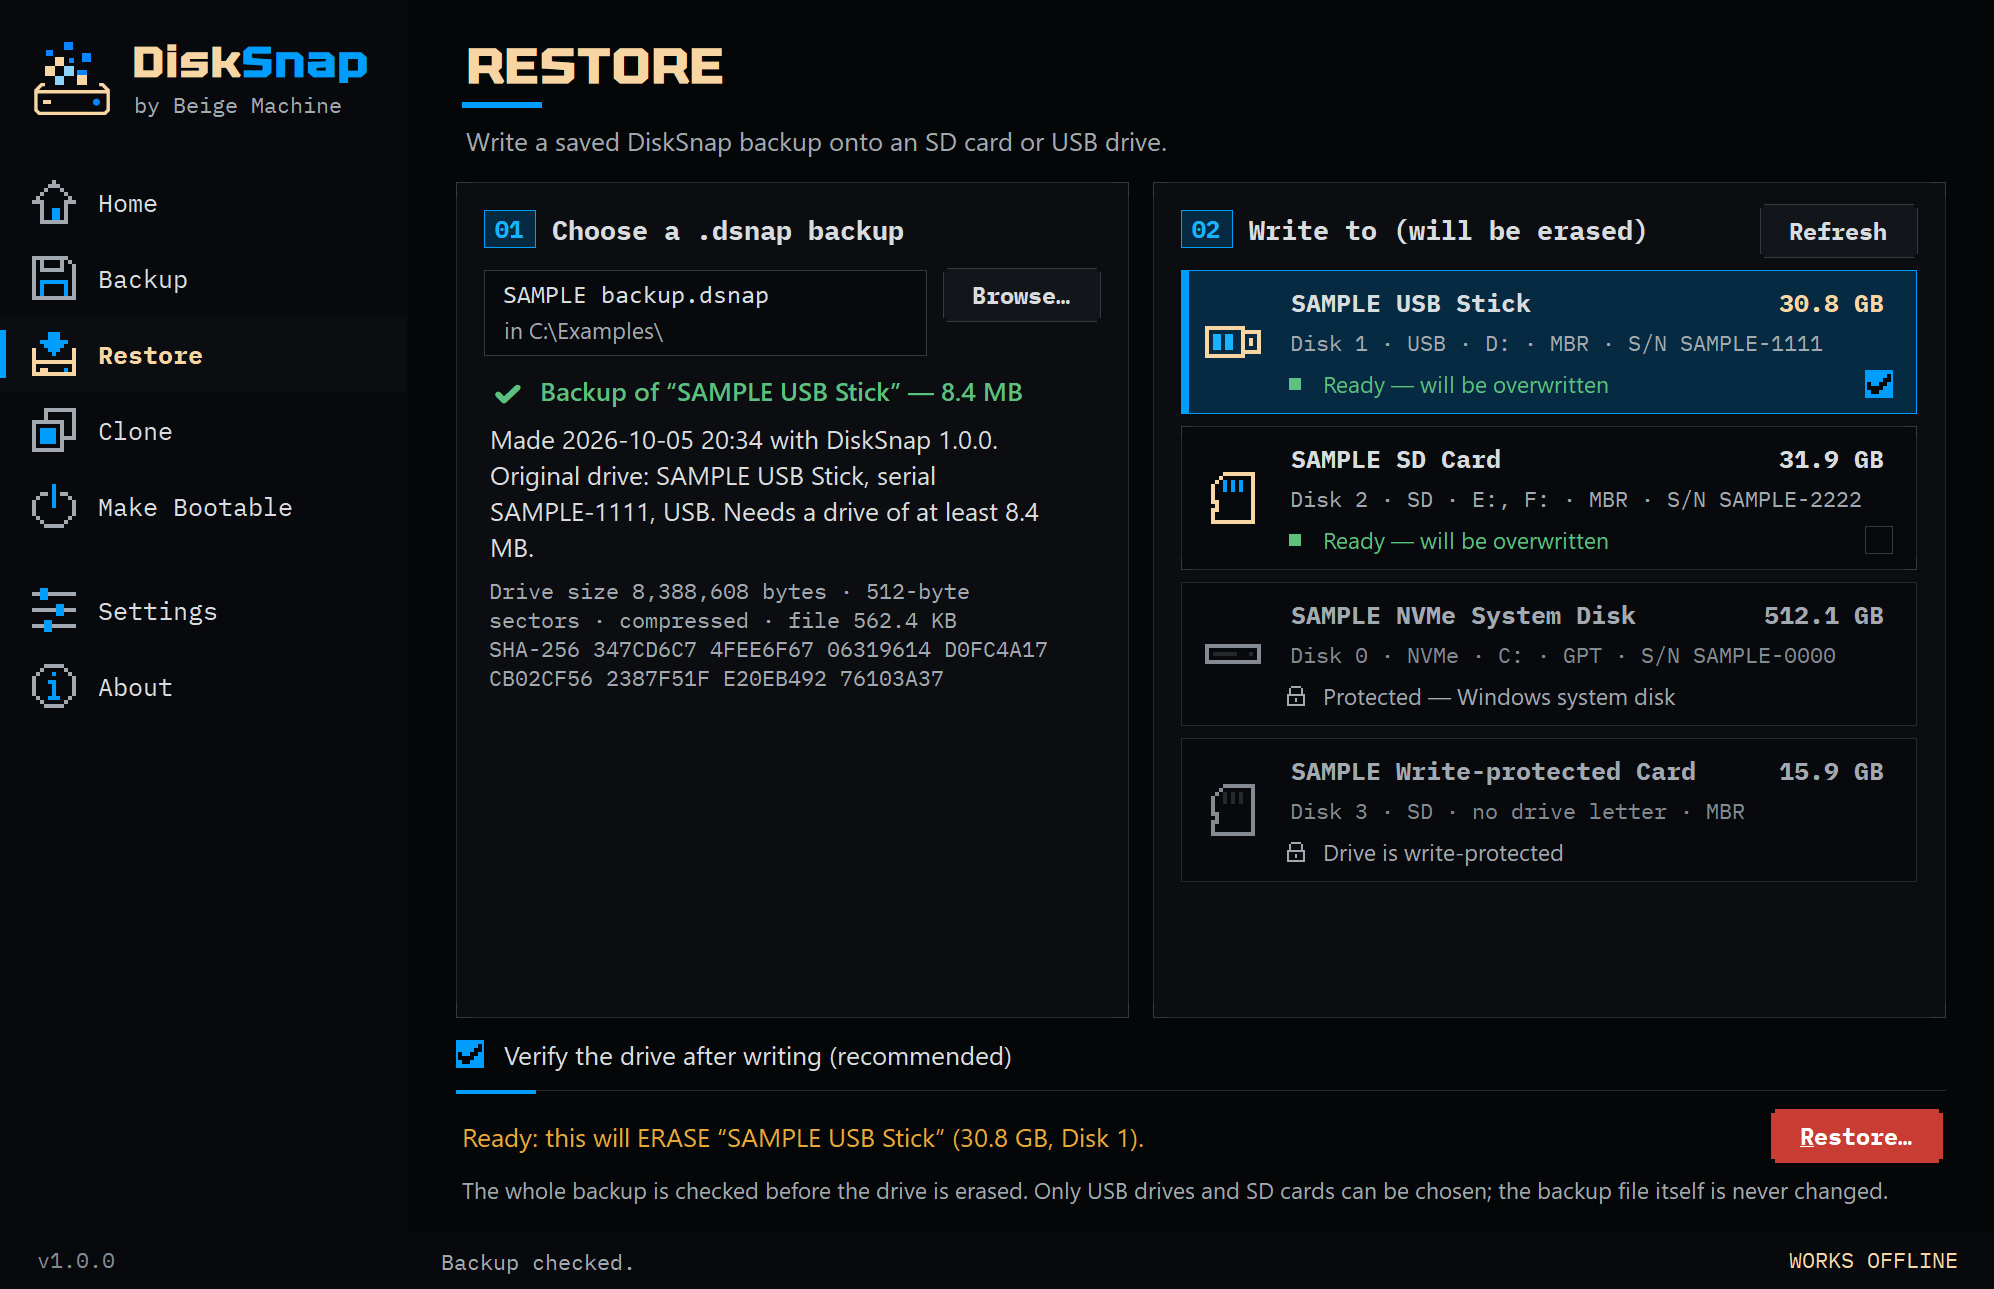
Step-by-step guide: Restore a DiskSnap backup
Restore writes a .dsnap backup back onto a USB stick or SD card. Afterwards the drive holds exactly what the original drive held when it was backed up: the same partition table, partitions, files and boot code.
| What happens to it | |
|---|---|
The .dsnap backup file (source) | Read only. Never changed, so you can restore it again. |
| The drive you restore onto (target) | Erased and overwritten with the backup. |
Size requirements
- The target must be at least as large as the original drive, not the backup file. A backup of a 16 GB stick needs a drive of at least that size, even if the file is much smaller. DiskSnap shows the exact byte count it needs, and locks drives that are too small (Too small for this backup (needs …)).
- Same size is fine. Watch out for sticks with the same label but slightly different real sizes (§15).
- Restoring to a smaller drive isn’t supported yet, even if the original was mostly empty.
- The target must use the same sector size as the original. DiskSnap checks this with the drive itself and refuses a mismatch before anything is erased.
Restoring to a larger drive
The backup fills the start of the drive. The restored partitions keep their original sizes, so the extra space at the end isn’t used by any partition until you do something with it (for example, expand a partition with another tool).
That extra space isn’t wiped, with one exception: while preparing the drive, DiskSnap clears its last 1 MiB (§7). None of the drive’s old files can be reached afterwards, but don’t treat the leftover space as securely erased either.
The larger-target completion message explains that preparation clears the last 1 MiB. Extra capacity is not automatically added to the copied partitions.
Step by step
- Plug in the drive to restore onto. Unplug other removable drives, so it’s the only possible target.
- Open Restore and click Browse… under 1 · Choose a DiskSnap backup (.dsnap). DiskSnap checks the file straight away and shows where it came from (the original drive’s name and serial number), when it was made, the drive size it needs, and its SHA-256. A damaged file, or one that isn’t a DiskSnap backup, is rejected here with the reason: This file can’t be restored.
- Choose the target under 2 · Choose the drive to restore to (it will be erased). Drives that are too small, or that hold the backup file, are locked.
- Leave Verify the drive after writing (recommended) ticked, and click Restore…. Allow the administrator restart if asked (§4). The backup stays selected; choose the drive again.
- Confirm. The box shows the target’s name, size, disk number, drive letters and serial number, the backup’s details, whether you’re restoring onto the same drive the backup came from (matching serial and size) or a different one, and a note if the target is larger. Tick the box and type ERASE.
- Wait for the result (below). Don’t unplug the drive before then.
What happens during a restore
- Checking the backup file. Every block is read, decompressed and checked, along with the whole-drive SHA-256. Nothing is erased unless the entire backup is good. DiskSnap also makes sure the file hasn’t changed since you chose it, and keeps it open read-only so it can’t change during the restore.
- Checking the drive. The target is re-checked: same drive, USB or SD, not the Windows drive, big enough.
- Preparing the drive (§7). From here on, the drive’s old contents are gone.
- Restoring the drive: the backup is written.
- Verifying (if Verify is on): the written part of the drive is read back and compared. As a final safeguard, what was written must also match the SHA-256 recorded in the backup when it was made.
How to tell it worked
The progress window ends with Complete, Restore: done and Verify: passed — the drive matches the backup. The green Restore complete panel shows how much was written and the SHA-256, with the words “This is the SHA-256 recorded when … was backed up.” Matching fingerprints mean the drive is identical to the original, byte for byte, over the size of the original.
Windows may then offer to format partitions it can’t read (Linux, Raspberry Pi). Click Cancel; the drive is fine.
Bootable backups
A backup of a bootable drive includes its partition table and boot data. After restoring it, check that the destination computer can boot it before relying on the copy. Verification alone is not a boot check.
After restoring, the drive may not stay byte-identical for long: Windows sometimes writes a new disk ID onto it once DiskSnap has finished (§16). That doesn’t affect the files on it.
If you cancel or it fails partway
If DiskSnap had already started preparing or writing the drive, the drive is incomplete and its old contents are gone. Restore it again, or format it in Windows to reuse it. The backup file is never changed.
13. Clone
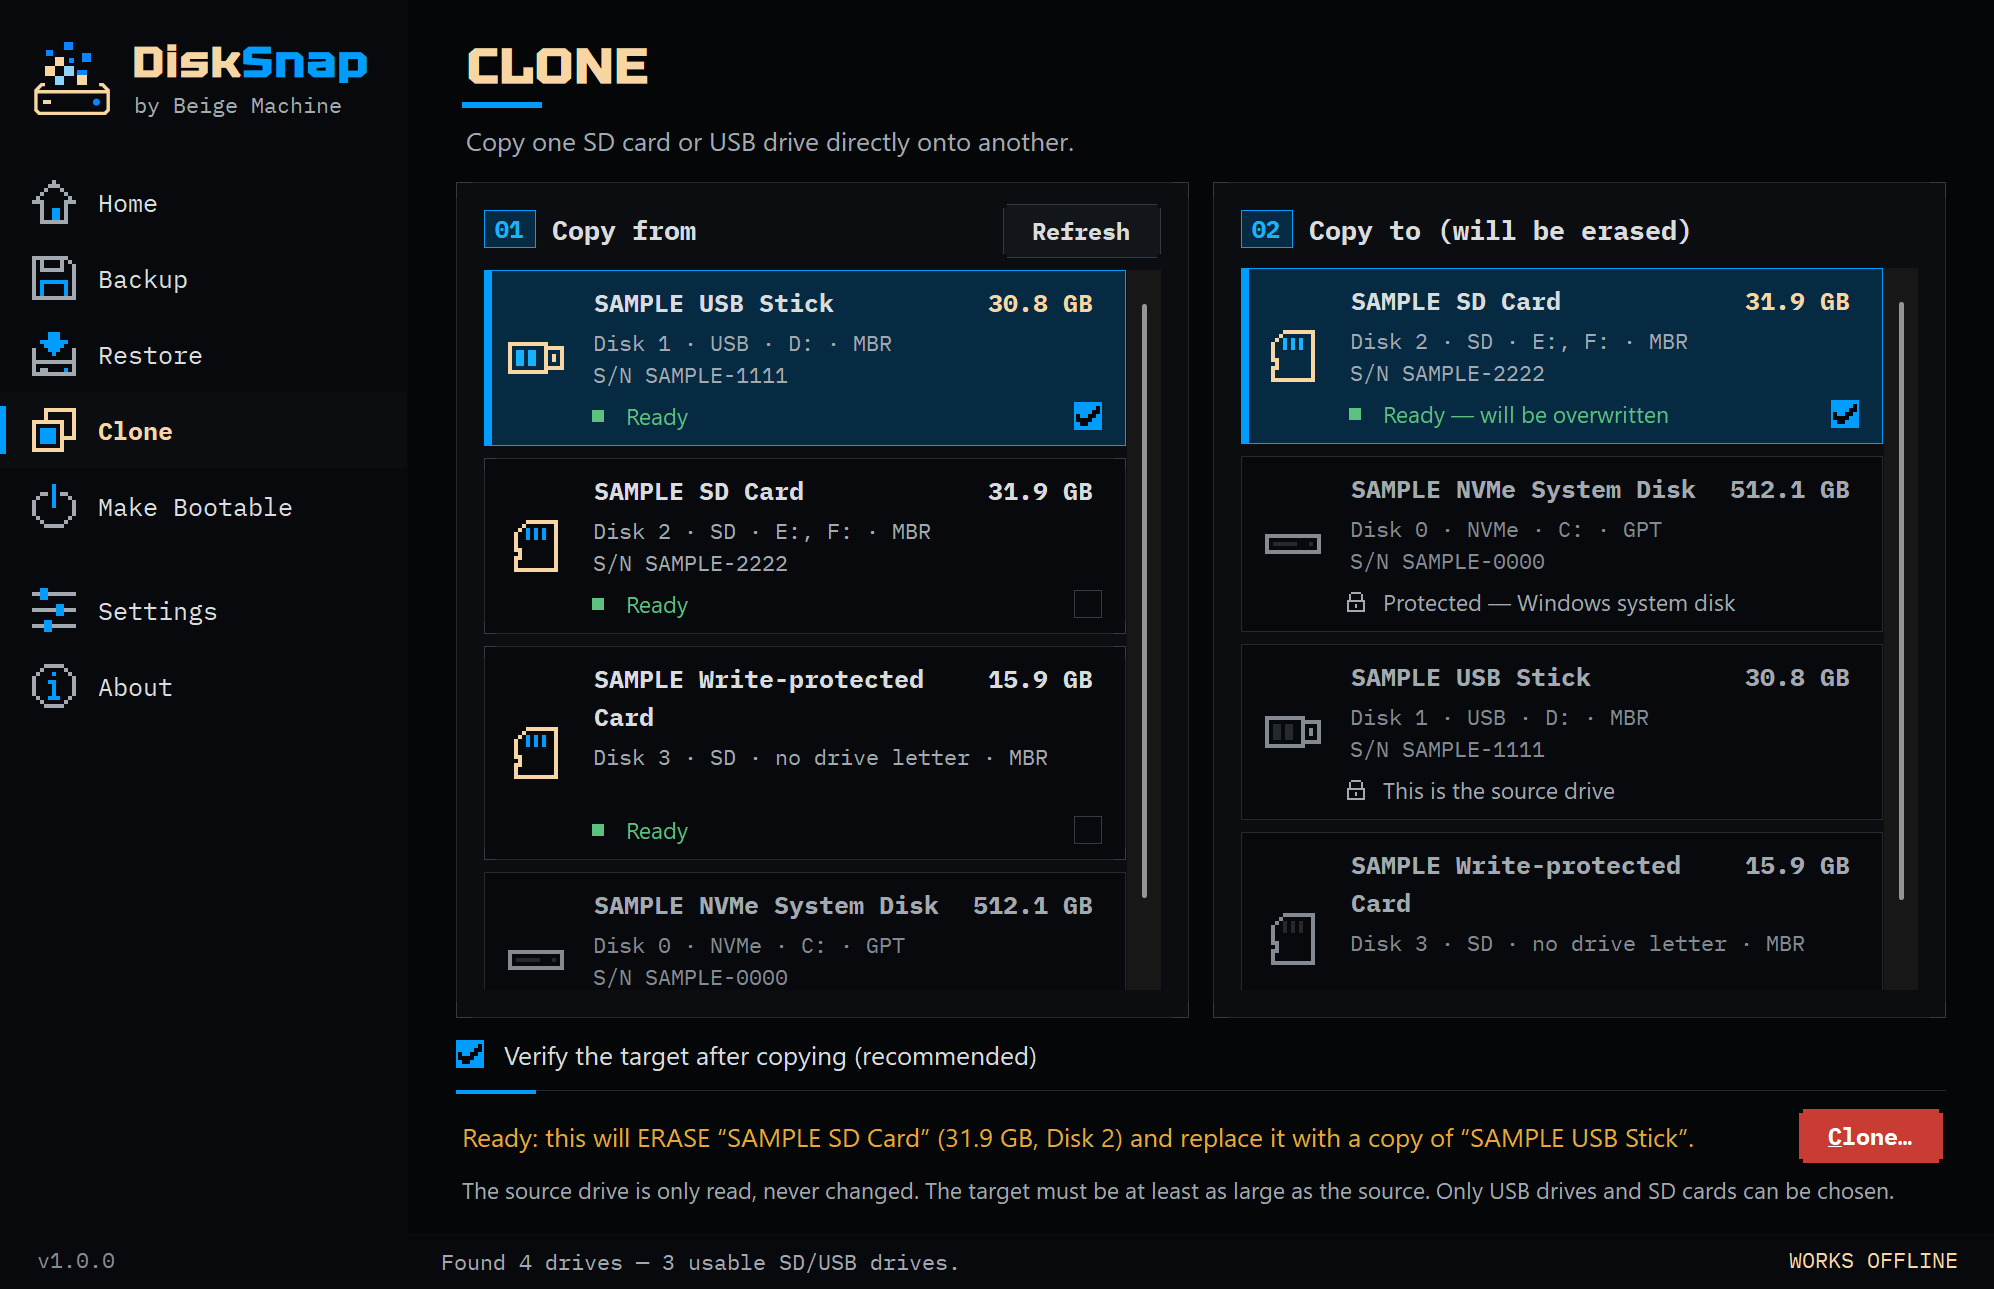
Step-by-step guide: Clone a USB stick or SD card
Clone copies one USB stick or SD card directly onto another, sector by sector: partition table, partitions, files and boot code. No file is left on your PC. If you want a copy to keep, use Backup instead (or as well).
Source and target
| Drive | On screen | What happens to it |
|---|---|---|
| Source | 1 · Copy from | Only read, never changed. Opened read-only, and locked for reading so nothing can change it mid-copy. |
| Target | 2 · Copy to (it will be erased) | Completely erased and replaced with an exact copy of the source. |
- A drive can never be cloned onto itself. Once you pick a source, it’s locked in the target list as This is the source drive. DiskSnap checks this by the drive’s identity and its disk number, and again just before writing.
- The line at the bottom of the page spells out the direction before you start: Ready: this will ERASE “…” (…, Disk …) and replace it with a copy of “…”.
Telling two drives apart
With two sticks of the same make and size, the names and sizes look identical. The serial number (S/N on each drive card) is how you tell them apart. Note the target’s serial before you start.
The Clone confirmation shows both source and target serial numbers where reported. Compare both with the physical drives before typing ERASE.
Target-size rules
- The target must be at least as large as the source. Smaller drives are locked (Too small to clone the source onto (needs …)). Cloning to a smaller drive isn’t supported yet.
- A target exactly the same size is fine.
- Both drives must use the same sector size. DiskSnap refuses a mismatch before writing.
Cloning to a larger drive
The copy fills the start of the target, exactly the size of the source. The copied partitions keep their original sizes, so the extra space isn’t used by any partition.
The extra space isn’t wiped, except its last 1 MiB, which DiskSnap clears while preparing the target (§7). None of the target’s old files can be reached afterwards, but don’t treat the leftover space as securely erased.
The larger-target completion message explains that preparation clears the last 1 MiB. Extra capacity is not automatically added to the copied partitions.
Step by step
- Plug in both drives. Unplug every other removable drive.
- Open Clone. Choose the source under 1 · Copy from, then the target under 2 · Copy to (it will be erased).
- Read the Ready: this will ERASE… line and check the direction.
- Leave Verify the target after copying (recommended) ticked.
- Click Clone… Allow the administrator restart if asked. Clone keeps nothing across the restart: choose both drives again.
- Confirm: check the target’s name, disk number, drive letters and serial number, tick the box, type ERASE.
- Wait for the result. Leave both drives plugged in.
What happens during a clone
- Checking the drives: both are re-checked (same drives, USB or SD, not the same drive, not the Windows drive, target big enough, same sector size).
- Preparing the source drive: it’s opened read-only and its partitions locked for reading (Holding it still while it is read).
- Preparing the drive: the target is prepared (§7). From here on, its old contents are gone.
- Cloning the drive: the source is read once, start to end, and written to the target, while its SHA-256 is calculated.
- Verifying (if Verify is on): the copied range is read back from the target and its SHA-256 compared with the source’s.
How to tell it worked
The progress window ends with Complete, Clone: done and Verify: passed — the target matches the source. The green Clone complete panel says the target is now a copy and nothing on the source changed, and shows how much was copied and the source’s SHA-256.
Two identical drives afterwards
A successful clone is identical to the source, including the IDs Windows uses to tell disks apart. What we’ve seen so far (§16 has the detail):
- After cloning a GPT stick onto an identical stick, with the source still connected, Windows took the copy offline (reason: collision) and gave it no drive letter. DiskSnap then shows it as Drive is offline in Windows.
- After cloning an MBR stick whose disk ID was blank, Windows wrote a new disk ID onto the copy once DiskSnap had finished with it. This changed four bytes at the start of the copy and nothing else. Verification had already passed.
Unplug the source before you use the copy.
Cancelling, or if it’s interrupted
The source is never changed. If you cancel, or a drive is removed, before preparation starts, nothing was written. After that, the target is incomplete and its old contents are gone: DiskSnap says “The target drive may already have been changed and may be incomplete. The source drive was not changed.” Clone it again, or format it in Windows to reuse it.
14. Verification and checksums
Verification is DiskSnap checking its own work, by reading the result back and comparing it with what should be there. It’s on by default (Settings: Verify after every operation (recommended)), and we recommend leaving it on. It adds roughly one extra read of the data.
| Operation | What’s verified |
|---|---|
| Make Bootable (Linux ISO / disk image) | The drive is read back and its SHA-256 compared with the image’s |
| Make Bootable (Windows installer) | The copied files and the UEFI boot loader are checked. |
| Backup | The saved file is read back from disk (bypassing Windows’ cache), every block is checked, and the whole-drive SHA-256 compared. The drive isn’t read a second time |
| Restore | The whole backup is checked before anything is erased. Afterwards the drive is read back and compared, and what was written must match the SHA-256 recorded at backup time |
| Clone | The copied range of the target is read back and its SHA-256 compared with the source’s, as read during the same clone |
If you turn Verify off, the result says Verify: skipped (turned off) and the result title is shown in amber rather than green.
Why it matters
USB sticks and SD cards fail more often than people expect, and counterfeit ones sometimes claim more space than they really have. They accept data, then quietly lose it. A write can appear to succeed and still be wrong. Verification catches this. If it fails, DiskSnap says so plainly: don’t rely on that drive.
SHA-256
A SHA-256 checksum is a 64-character “fingerprint” of data. Change a single byte and the fingerprint changes completely. DiskSnap shows it after Make Bootable, Backup, Restore and Clone.
Why a drive’s checksum can differ later
A checksum describes the data at the time it is read. If Windows or another program changes the drive afterwards, the checksum changes too. Clone verification compares the target with the source as read during that operation.
Tip
Linux distributions publish SHA-256 checksums for their ISOs. The checksum DiskSnap shows after Make Bootable is of the data it wrote, which for an uncompressed ISO should be the ISO itself. Compare a publisher checksum with the exact downloaded file it describes. A compressed download and its uncompressed image have different fingerprints; do not compare one with the other. DiskSnap verification does not establish who published an image.
15. Drive sizes, and why Windows shows different numbers
DiskSnap shows sizes in decimal gigabytes, where 1 GB = 1,000,000,000 bytes. That's the same way drive manufacturers label them, so a "32 GB" stick looks close to 32 GB in DiskSnap.
Windows File Explorer counts in binary units (1 GB = 1,073,741,824 bytes) but still labels them "GB", so the same drive looks smaller there.
For example, 32,000,000,000 bytes is 32 GB in decimal units and about 29.8 GiB in binary units. This difference does not mean space has disappeared.
Also note:
- Two sticks of the same model and label can differ slightly in size. Because Restore and Clone need a target at least as large as the source, a "32 GB" stick can sometimes be too small for another "32 GB" stick's backup. DiskSnap shows exact byte counts where it matters.
- Explorer only shows the partitions it can read, not the whole drive. Use the size DiskSnap shows.
Larger, smaller and identical-size targets
| Target compared with the source | Restore and Clone | Make Bootable |
|---|---|---|
| Smaller, even by one sector | Refused. The drive is locked as too small | Refused before writing: Choose a larger drive |
| Exactly the same size | Fine. The whole target is replaced | Fine |
| Larger | Fine. The copy fills the start; partitions keep their sizes; the extra space isn’t wiped except the last 1 MiB | Fine. For ISOs and disk images, the same as Restore. Windows installers are laid out differently (§16) |
After writing onto a larger drive, Windows and other tools only show the partitions that were copied, so the drive can look smaller than it is. That’s expected: the extra space is there, unallocated. See Troubleshooting.
16. What happens to partitions
Because DiskSnap copies whole drives sector by sector:
- The target’s old partitions disappear entirely. They’re replaced by exactly the source’s (or image’s) partition table and partitions.
- Partition sizes don’t change. On a larger target, the extra space is left over and unused (§15).
- Linux and Raspberry Pi partitions come across intact, even though Windows can’t read them. Windows may show them without drive letters, as unknown, or offer to format them. That’s normal; don’t format them.
- Drive letters may change afterwards, since Windows assigns them to whatever partitions it recognises.
- DiskSnap asks Windows to re-read the drive’s layout after writing, so it usually appears straight away. If not, unplug and replug it.
The Windows installer mode of Make Bootable is the exception: it creates a fresh MBR layout with one FAT32 partition (capped at about 32 GB, with any extra space left unallocated) and copies files onto it.
Disk IDs and Windows
Every partition table carries an ID that Windows uses to tell disks apart: a 4-byte disk signature on MBR drives, a disk GUID on GPT drives. DiskSnap copies these exactly, like everything else. It doesn’t make up new ones. Keep these two behaviours in mind:
- Two identical drives connected at once. After a clone, the copy has the same ID as the source. With a GPT stick, Windows noticed the clash once the clone finished and took the copy offline (it logged that the two disks were the same). The copy had no drive letter while the source was still connected. DiskSnap lists an offline drive as Drive is offline in Windows.
- A blank MBR disk signature. Windows may assign a disk signature after a drive is released. This changes its whole-drive fingerprint even if the files have not changed.
Reconnect and re-identify drives before another operation. A disk identifier is separate from the files stored on the drive, and duplicate identifiers can affect how Windows mounts the drive.
If a write fails or is cancelled partway
the drive may end up with a mix of old and new data, for example a new partition table pointing at old contents. File Explorer may then show nonsense file names, impossible dates or odd sizes. Nothing is wrong with Windows. The drive is just incomplete. Don’t try to open or repair those files. Write the drive again, from a backup or the original image.
17. Common uses
USB flash drives
Make bootable Linux sticks, keep a backup of a stick of tools before lending it out, or clone a working stick as a spare.
SD and microSD cards
Typical uses are backing up a Raspberry Pi, emulation or camera card before experimenting, and restoring it if something breaks.
Linux and Ubuntu installation media
Use Make Bootable with an image from the operating system publisher. Check its architecture and boot requirements against the computer you intend to use.
Raspberry Pi images
Choose a Raspberry Pi OS image compatible with your Pi and use Make Bootable to write it to the card. Follow the Raspberry Pi OS guide for the complete workflow.
Backup and recovery
- Before experimenting: back up a working card or stick first. If it goes wrong, restore it.
- Replacing a failing card: restore the backup onto a new card of equal or larger size.
- Making spares: restore the same backup onto several drives.
18. Troubleshooting
Troubleshooting has its own page, organised by what you see: DiskSnap Troubleshooting. The most common questions:
- A drive doesn’t appear in DiskSnap
- A drive is shown but locked
- Verification failed
- Windows asks to format the drive afterwards
- A bootable USB stick won’t boot
- What to do after a failed or interrupted operation
Where to find the log
Settings → Open log folder, or %LocalAppData%\Beige Machine\DiskSnap\Logs. There’s one file per day, and it records every step of every operation. Include it when reporting a problem.
19. Frequently asked questions
Does Backup change my drive? No. The drive is opened read-only. DiskSnap only locks it while it reads, so nothing can change mid-backup.
Can I back up just some files? No. DiskSnap images whole drives. Use File Explorer to copy individual files.
Can I restore to a smaller drive if the original was mostly empty? No. The target must be at least as large as the original drive in bytes.
Can I back up my PC's internal drive or Windows drive? No. DiskSnap only works with USB sticks and SD cards, and internal drives are always locked.
Can I open a .dsnap file to get files out of it?
Not currently. Restore it to a drive first.
Can I store backups on OneDrive, a NAS or an external drive?
Yes, you can copy finished .dsnap files anywhere. Keep a copy somewhere other than your PC (§20). The file is checked in full before any restore, so a copy that got damaged in transit won't erase your drive.
Why is my backup so big / so small? Empty space that's all zeros takes almost nothing. Old deleted data still counts (§11).
Does DiskSnap need the internet? No. It works entirely offline and never uploads anything.
Why does DiskSnap ask for administrator rights? Windows only lets administrators read or write a whole drive directly. DiskSnap only asks when you start an operation.
Is it safe to unplug the drive after it finishes? Yes, once DiskSnap says it's complete. Not before.
20. Safety and good habits
- The target of Make Bootable, Restore and Clone is completely overwritten. Every partition and file on it is erased. There's no undo.
- Never select a drive that holds data you need, unless it's the source of a Backup or Clone.
- Unplug removable drives you're not using before you start, so there's only one possible choice.
- Check the serial number in the confirmation box, especially with two identical-looking drives.
- Leave Verify on.
- Keep important backups in more than one place: for example one on your PC and one on an external drive or cloud storage. A backup that exists in only one place isn't really safe.
- Test your backups now and then by restoring them to a spare drive.
- Label your drives and cards. A small sticker saves a lot of guessing.
- Don't unplug a drive while DiskSnap is working on it.
- Before changing firmware (BIOS/UEFI) settings, have your BitLocker recovery key ready.
21. Glossary
| Term | Meaning |
|---|---|
Backup (.dsnap) |
A file holding a complete copy of a drive, made by DiskSnap |
| BitLocker | Windows drive encryption. Changing firmware settings can trigger its recovery screen |
| Boot menu | A menu shown at start-up (often F12/F11/Esc) to choose which drive to start from |
| Checksum | A short value calculated from data, used to detect changes. DiskSnap uses CRC-32 and SHA-256 |
| Clone | Copying one drive directly onto another |
| CRC-32 | A quick checksum DiskSnap uses on each block of a backup |
| Disk signature / disk GUID | The ID stored in a drive’s partition table (MBR: a 4-byte signature; GPT: a GUID) that Windows uses to tell disks apart. A clone copies it (§16) |
| Disk number | The number Windows gives each connected drive (Disk 0, Disk 1…). It can change when drives are plugged or unplugged |
| Dismount | Making Windows let go of a drive's partitions so they can be safely overwritten |
| Elevation | Running a program with administrator rights |
| FAT32 | An old file system many devices can read. It can't store files over 4 GB |
| GPT / MBR | The two kinds of partition table. MBR is older; GPT is newer |
| Hybrid ISO | An ISO designed to work both on a DVD and written directly to a USB stick. Most Linux ISOs are hybrid |
| Image | A file holding the exact contents of a drive or disc |
| ISO | A disc image file (.iso) |
| Partition | A section of a drive, formatted with a file system |
| Preparation | What DiskSnap does to a target just before writing: lock it, remove its old partition table, set up an empty one and clear its last 1 MiB (§7) |
| Raw / sector-by-sector copy | Copying every sector of a drive exactly, regardless of files |
| Sector | The smallest unit a drive stores, usually 512 bytes |
| Secure Boot | A UEFI feature that only starts trusted, signed software |
| Serial number | A number identifying a particular drive, shown as S/N |
| SHA-256 | A strong checksum ("fingerprint") used to prove two copies are identical |
| Source / target | The drive or file being copied from (only ever read), and the drive being written to (erased) (§9) |
| UEFI / BIOS | The firmware that starts a PC. UEFI is the modern version |
| Verification | Reading the result back to prove it was copied correctly |
22. Known limitations and version notes
DiskSnap 1.0.0
All four tools are free for personal and business use, on unlimited PCs. No activation or paid unlock is included.
Current limits
- Internal disks are not selectable. DiskSnap is intended for USB drives and SD/MMC media.
- Restore and Clone require a target at least as large as the original, with compatible sector size. No automatic partition expansion is provided.
- A .dsnap backup cannot be mounted or browsed directly.
- Windows installer media uses the UEFI path.
- Two otherwise-identical drives with no serial number and no unique ID can be treated as the same drive. A clone is blocked rather than offered with ambiguous identity.
- Clones retain disk identifiers; Windows may take one of two identical disks offline.
23. Related guides
- Make a bootable Ubuntu USB
- Back up a USB stick or SD card
- Restore a DiskSnap backup
- Clone a USB stick or SD card
- Boot a PC from USB
- Secure Boot: why won’t my USB boot?
- Imaging vs cloning vs copying files
- DiskSnap Troubleshooting
- Make a Raspberry Pi OS SD card
- Report a problem / contact