
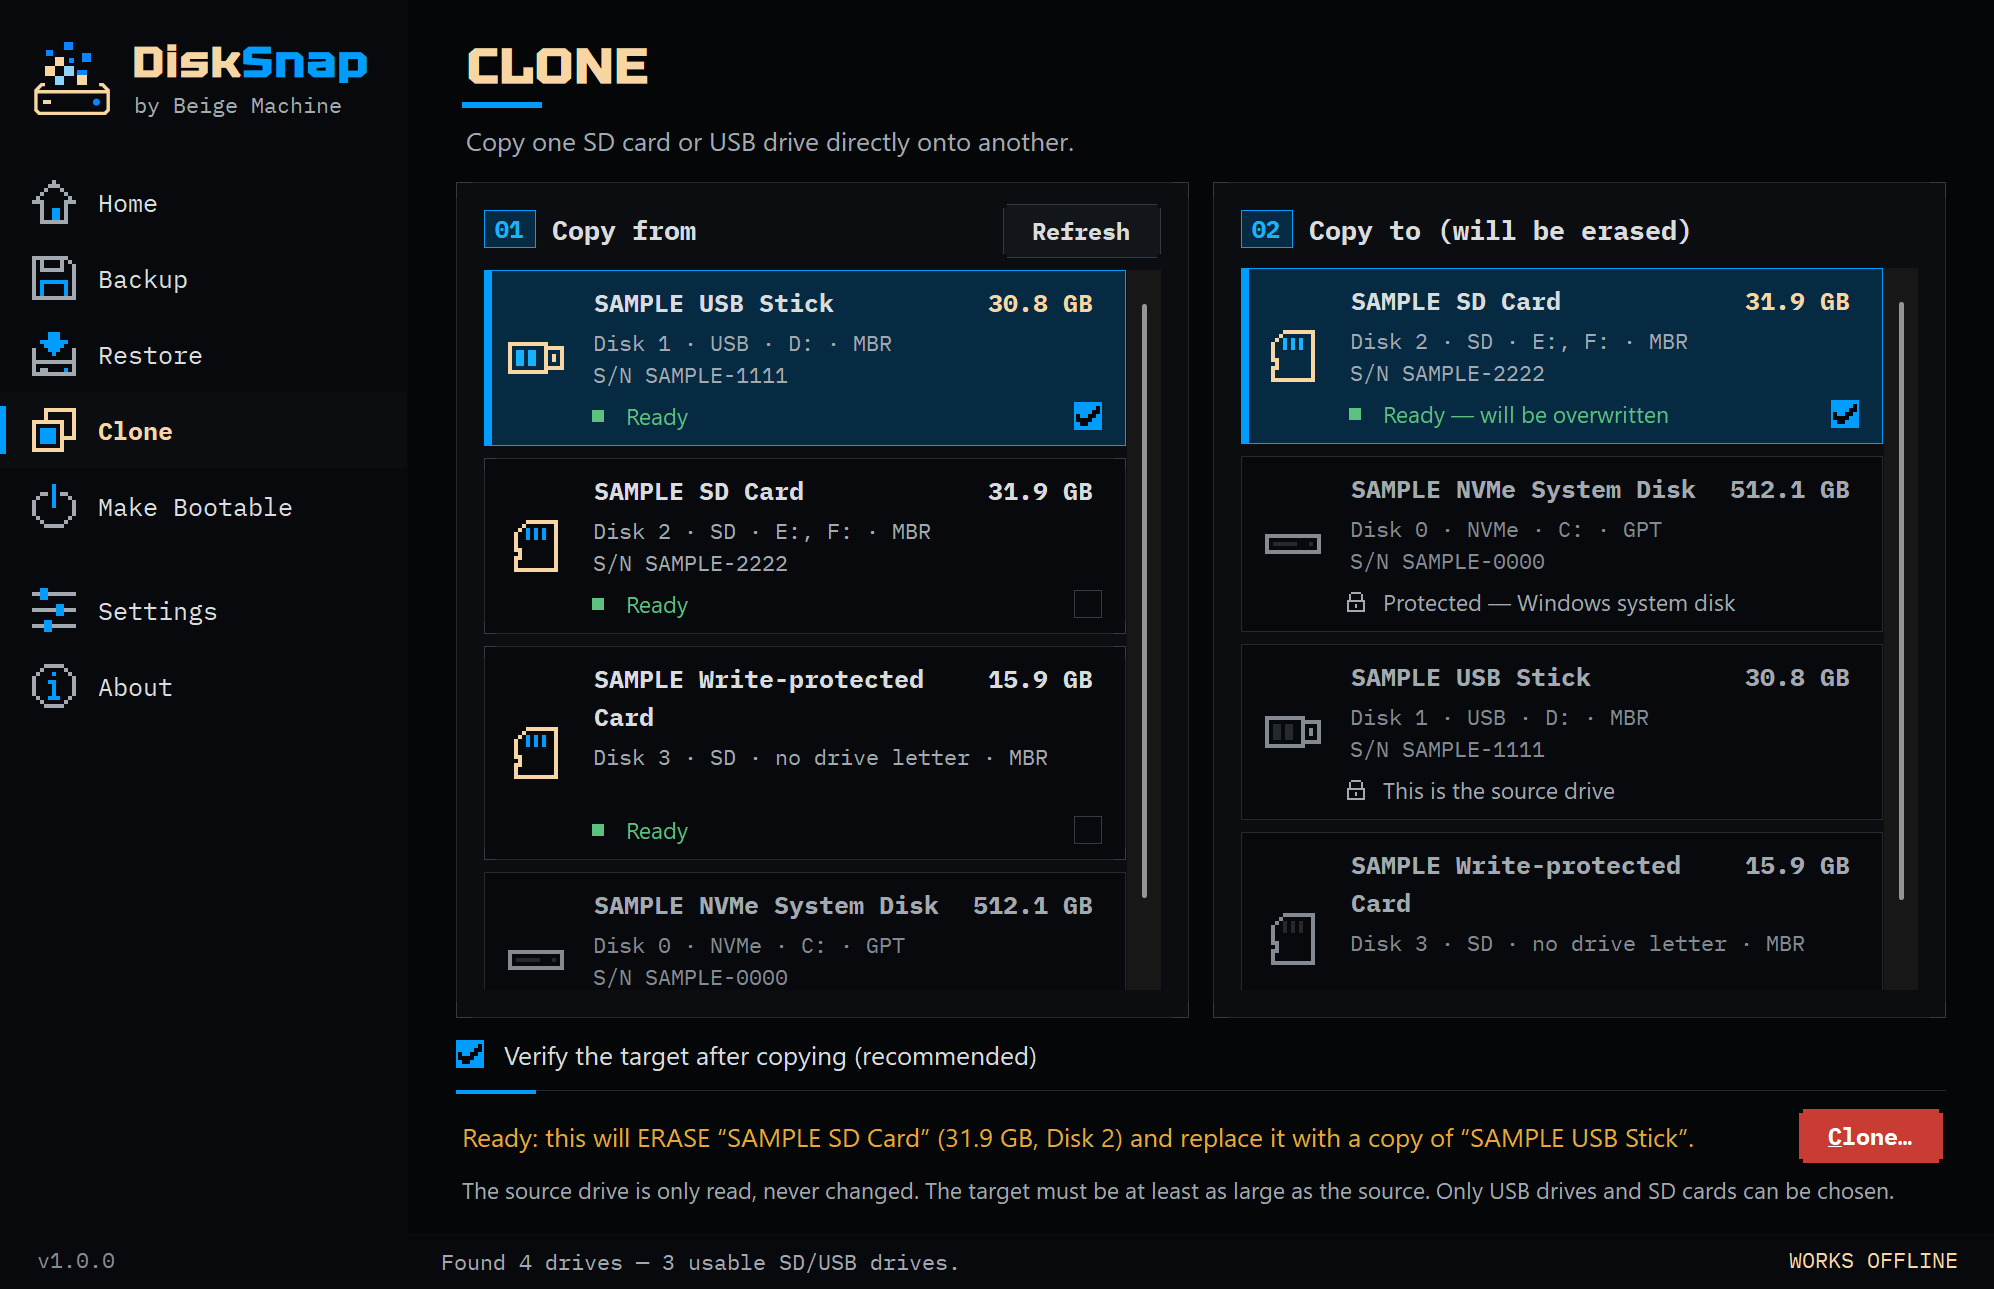
Cloning copies one USB stick or SD card directly onto another: every partition, every file and the boot setup, byte for byte. It’s the quickest way to make a spare of a working Raspberry Pi card, or a second copy of a boot stick. Unlike a backup, there’s no file left on your PC afterwards. If you want something to keep, make a backup instead (or as well).
The target drive will be completely erased
Clone has two drives, and it matters which is which. The source (Copy from) is only read. The target (Copy to) loses everything on it and becomes a copy of the source. Getting them the wrong way round would wipe the drive you meant to copy.
What you’ll need
- A Windows PC with DiskSnap on it, and an account that can approve an administrator prompt.
- The source: the USB stick or SD card you want to copy.
- The target: a USB stick or SD card at least as large as the source, holding nothing you need.
- Somewhere to plug both in at once, for example two USB ports, or a USB port and a card reader.
Before you start
| Drive | In DiskSnap | What happens to it |
|---|---|---|
| Source | 1 · Copy from | Read only. Opened read-only, never changed. |
| Target | 2 · Copy to (it will be erased) | Erased and overwritten with a copy of the source. |
| Your PC’s own drive | Shown, but locked | Not touched. |
- Know which drive is which before you plug them in. Two sticks of the same make can look identical in the list. Their serial numbers are the reliable way to tell them apart. Note the target’s serial so you can check it in the confirmation box. A bit of tape with “SOURCE” written on it doesn’t hurt either.
- Size: the target must be the same size as the source or bigger. Drives with the same label can differ slightly. If the target is even a little smaller, it’s locked as Too small to clone the source onto. Cloning to a smaller drive isn’t supported yet.
- Unplug every other USB drive and SD card, and close File Explorer windows showing either drive.
Clone the drive
- Plug in both drives and open DiskSnap.
- Click Clone in the menu on the left.
- Choose the source under 1 · Copy from. It’s then locked in the target list as This is the source drive, so a drive can never be cloned onto itself.
- Choose the target under 2 · Copy to (it will be erased).
- Read the line at the bottom. It spells out what’s about to happen: Ready: this will ERASE the target, and replace it with a copy of the source. Make sure the names match what you intend.
- Leave Verify the target after copying (recommended) ticked.
- Click Clone… The first time, DiskSnap explains that cloning needs administrator rights and offers to restart. Say yes and accept the Windows prompt. DiskSnap reopens on the Clone page. Choose both drives again, source first, and click Clone… once more.
- Check the confirmation box carefully. It shows the target’s name, size, disk number, drive letters and serial number, and names the source as only read, never changed. Compare the serial with the one you noted. If it’s right, tick I have checked this is the correct drive…, type ERASE, and confirm.
- Wait. The progress window shows how much has been copied and the speed. Leave both drives plugged in until it finishes.
What DiskSnap does while it works
- Checks both drives again. It confirms they’re the ones you chose, both USB sticks or SD cards, not the same drive, and not your Windows drive.
- Holds the source still. The source is opened read-only and locked for reading, so nothing can change it partway through the copy.
- Prepares the target. It locks the target and clears its old partition table.
- Copies the source onto the target from start to end, working out a SHA-256 fingerprint of the source as it goes.
- Verifies (if Verify is on) by reading the copied part of the target back and comparing it with the source’s fingerprint.
How to know it worked
The progress window ends with Complete, Clone: done and Verify: passed — the target matches the source. The summary says the target is now a copy, that nothing on the source changed, and how much was copied.
Windows wants to format the target? Click Cancel.
If the source has Linux, Raspberry Pi or other non-Windows partitions, Windows may offer to format them on the copy. The drive is fine. Formatting would erase the copy.
Afterwards: two identical drives
A clone is exact, right down to the ID numbers Windows uses to tell disks apart. Windows doesn’t like having two disks with the same ID connected at once. Windows may take the copy offline while the source is still connected.
- Unplug the source before you use or look at the copy.
- For drives with a blank disk ID (common on cameras and single-board computers), Windows may stamp a new ID onto the copy once DiskSnap has finished with it. That changes four bytes at the very start of the drive and doesn’t affect the files on it.
Cloning onto a bigger drive
The copy fills the start of the target, the same size as the source. The copied partitions keep their original sizes, so the extra space on a bigger target sits unused until you do something with it, for example by expanding a partition later.
DiskSnap doesn’t wipe that extra space. It does clear the very end of the target (the last 1 MiB) while preparing it, and none of the target’s old files can be reached afterwards. Treat everything that was on the target as gone, but don’t treat the leftover space as securely wiped.
Troubleshooting
The most common problems are below. For everything else, see DiskSnap Troubleshooting, organised by what you see.
The drive I want as the target is locked
Read the reason on it. This is the source drive means you picked it as the source. Too small to clone the source onto means you need a bigger target. Drive is write-protected means an SD card’s lock switch is on.
The two drives look identical
Go by the serial number in the confirmation box, not the name. If you’re not sure, cancel, unplug the target, and see which drive disappears from the list.
You stopped it, or a drive was pulled out
The source is never changed. If DiskSnap had already started preparing or writing the target, the target is incomplete and its old contents are gone. Clone again, or format it in Windows to reuse it.
Verification failed
Don’t use the copy. Try again in different USB ports. If it fails again, the target is probably faulty.
Safety notes
- The target is replaced completely, not just the part being copied to.
- Only USB sticks and SD cards can be chosen. Internal drives and the Windows drive are always locked.
- If the source matters, back it up first. A backup is cheap insurance against picking the wrong drive.